I’m sure you’ve heard of famous candlesticks like the hammer:

Or the bullish engulfing candle:
And rightly so, as these candlestick patterns are super explosive!
However…
There’s another candlestick pattern that’s the “handiest” out of all the patterns out there.
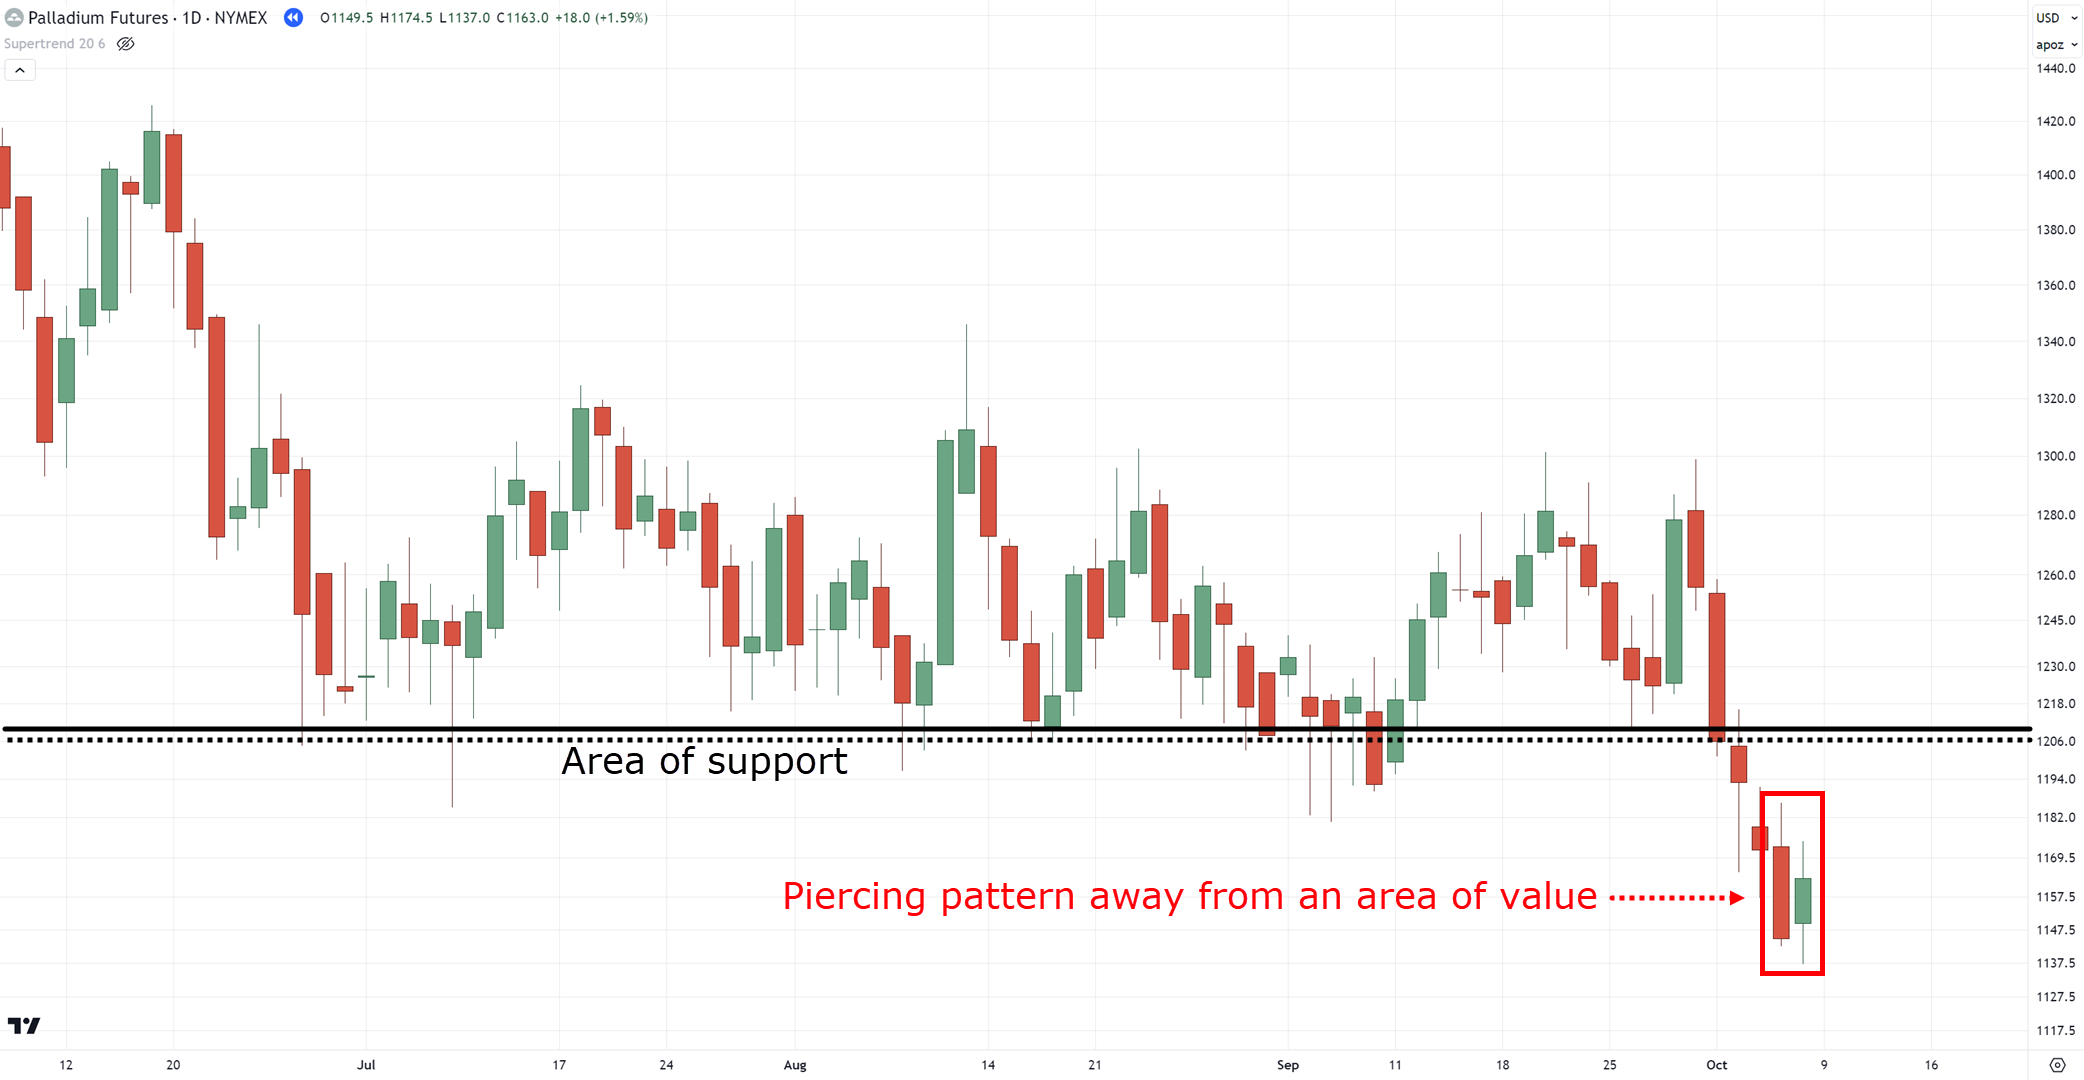
And that, my friend, is the piercing pattern:
And in this trading guide, I’ll share with you just how useful it can be to your trading plan!
Nonetheless, here’s what you’ll learn for today:
- What makes the piercing pattern different from other candlestick patterns out there
- The “secret” to using the piercing pattern on how it can make your trading life much easier
- A time-tested formula for trading the piercing pattern (and other candlestick patterns out there)
- Two key things NOT to do when trading the piercing pattern
If you’re a candlestick pattern practitioner then you’re in for a treat.
Because at the end of this guide…
I bet you’ll learn something new even if you’ve been using candlestick patterns for years.
So, let’s get started!
What is the piercing pattern and what makes it different from other candlestick patterns?
In textbook terms…
A piercing pattern happens when a candle gaps down at the open:
And then closes back above 50% of the previous candle’s body!
The sellers dived into freezing waters and immediately jumped back up!
You might be wondering:
“Wait a minute, that looks like a bullish engulfing candle!”
Well, not so fast, my friend!
If you recall, a bullish engulfing happens when the candle closes “beyond” the previous candle!
It’s like the sellers took a dive into cold waters and immediately jumped out into outer space like Superman!
So, if it’s not similar to the bullish engulfing pattern…
Then how about an inside bar?
Aha, quite close!
But as you can see, the whole body of the recent candle is inside the previous candle!
Now I know you might be thinking:
“Why are we comparing the piercing pattern to other candlesticks?”
The answer is this:
In the real world of trading, our “textbook” definitions break down.
Therefore, there can be exceptions to our textbook definitions of them.
So, if I ask you…
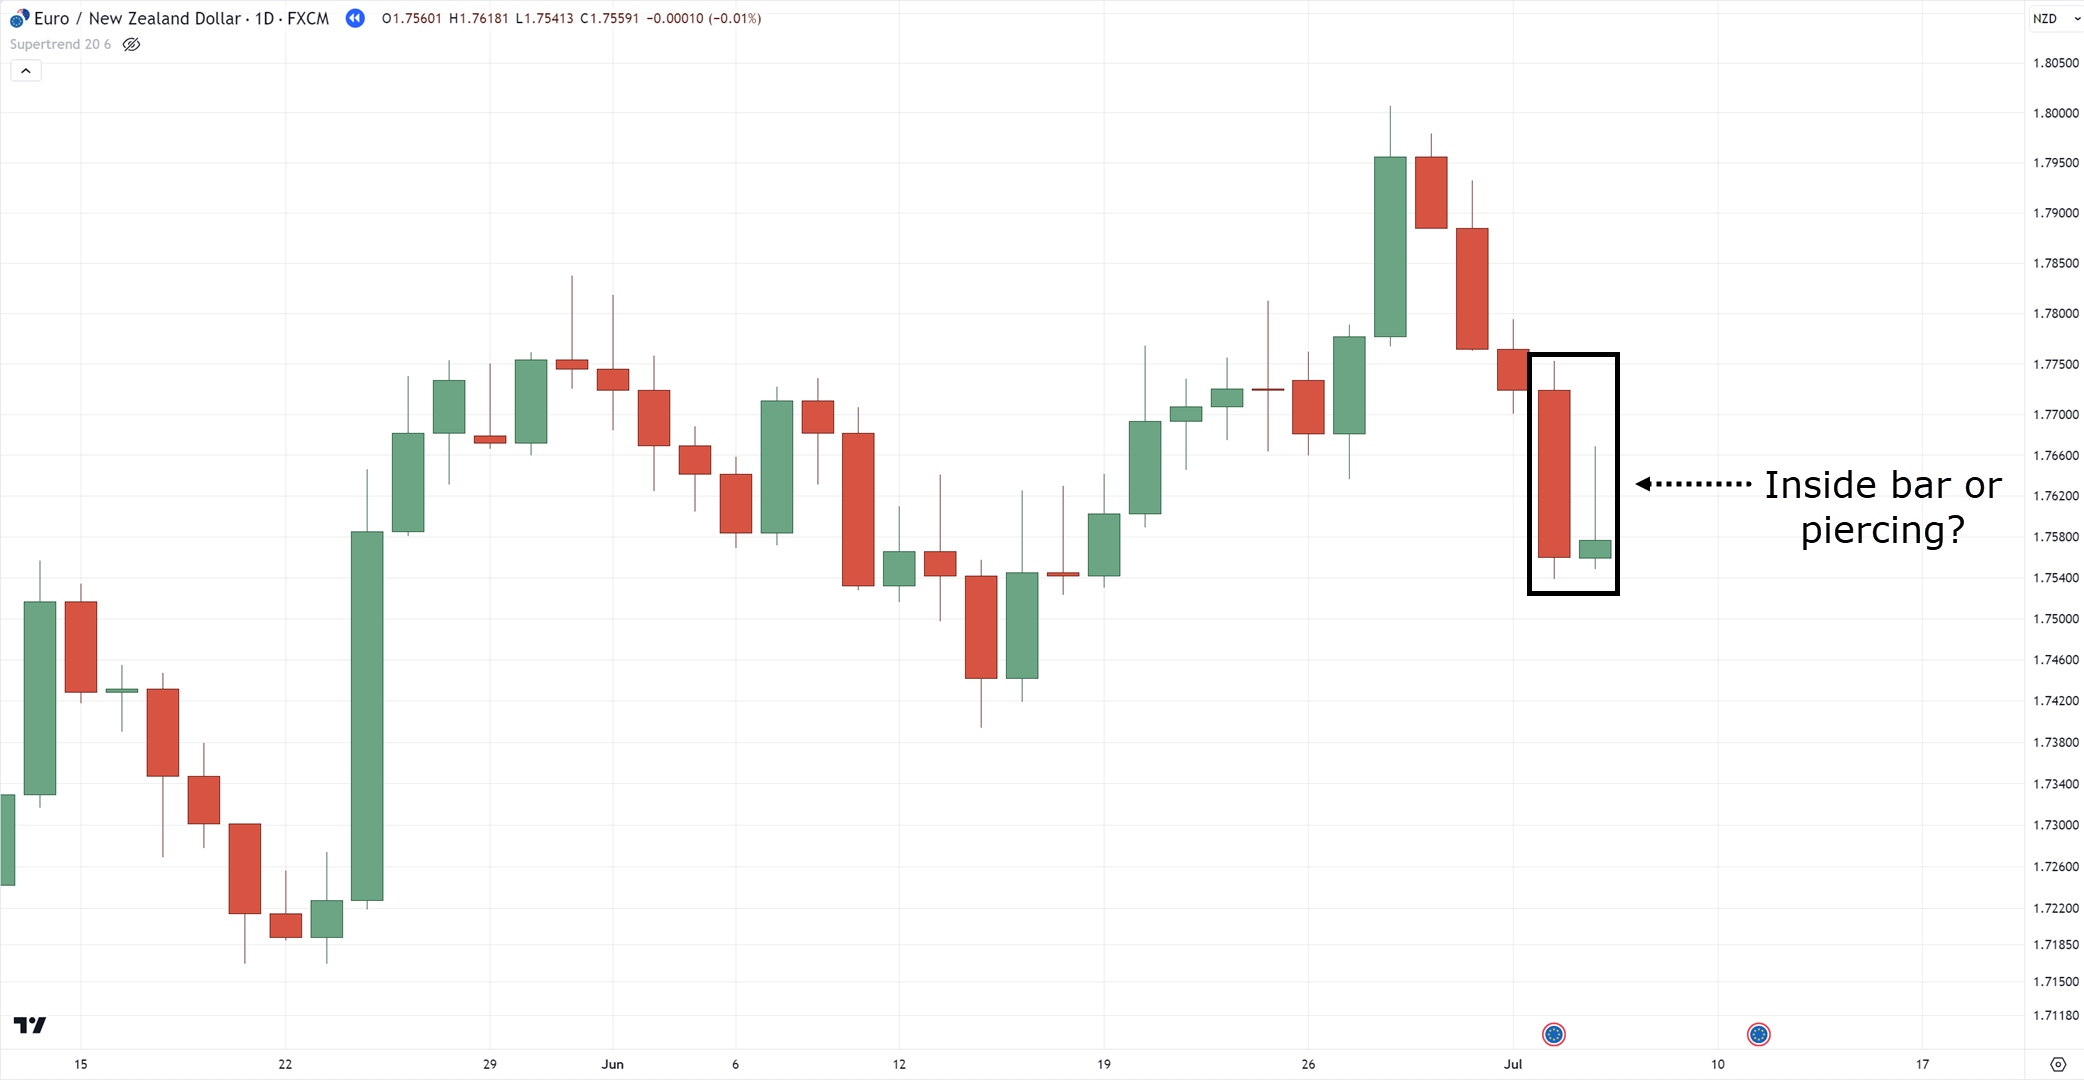
Is this an inside bar or a piercing pattern?
Do you include the wicks in context or not?
If you answered inside the bar then you are correct.
Why?
Because of this one simple rule:
The candle must close at least 50% of the previous candle.
And yes, this excludes the wicks!
So, can you see how important it is to differentiate the piercing pattern from other candlestick patterns?
Now a quick test…
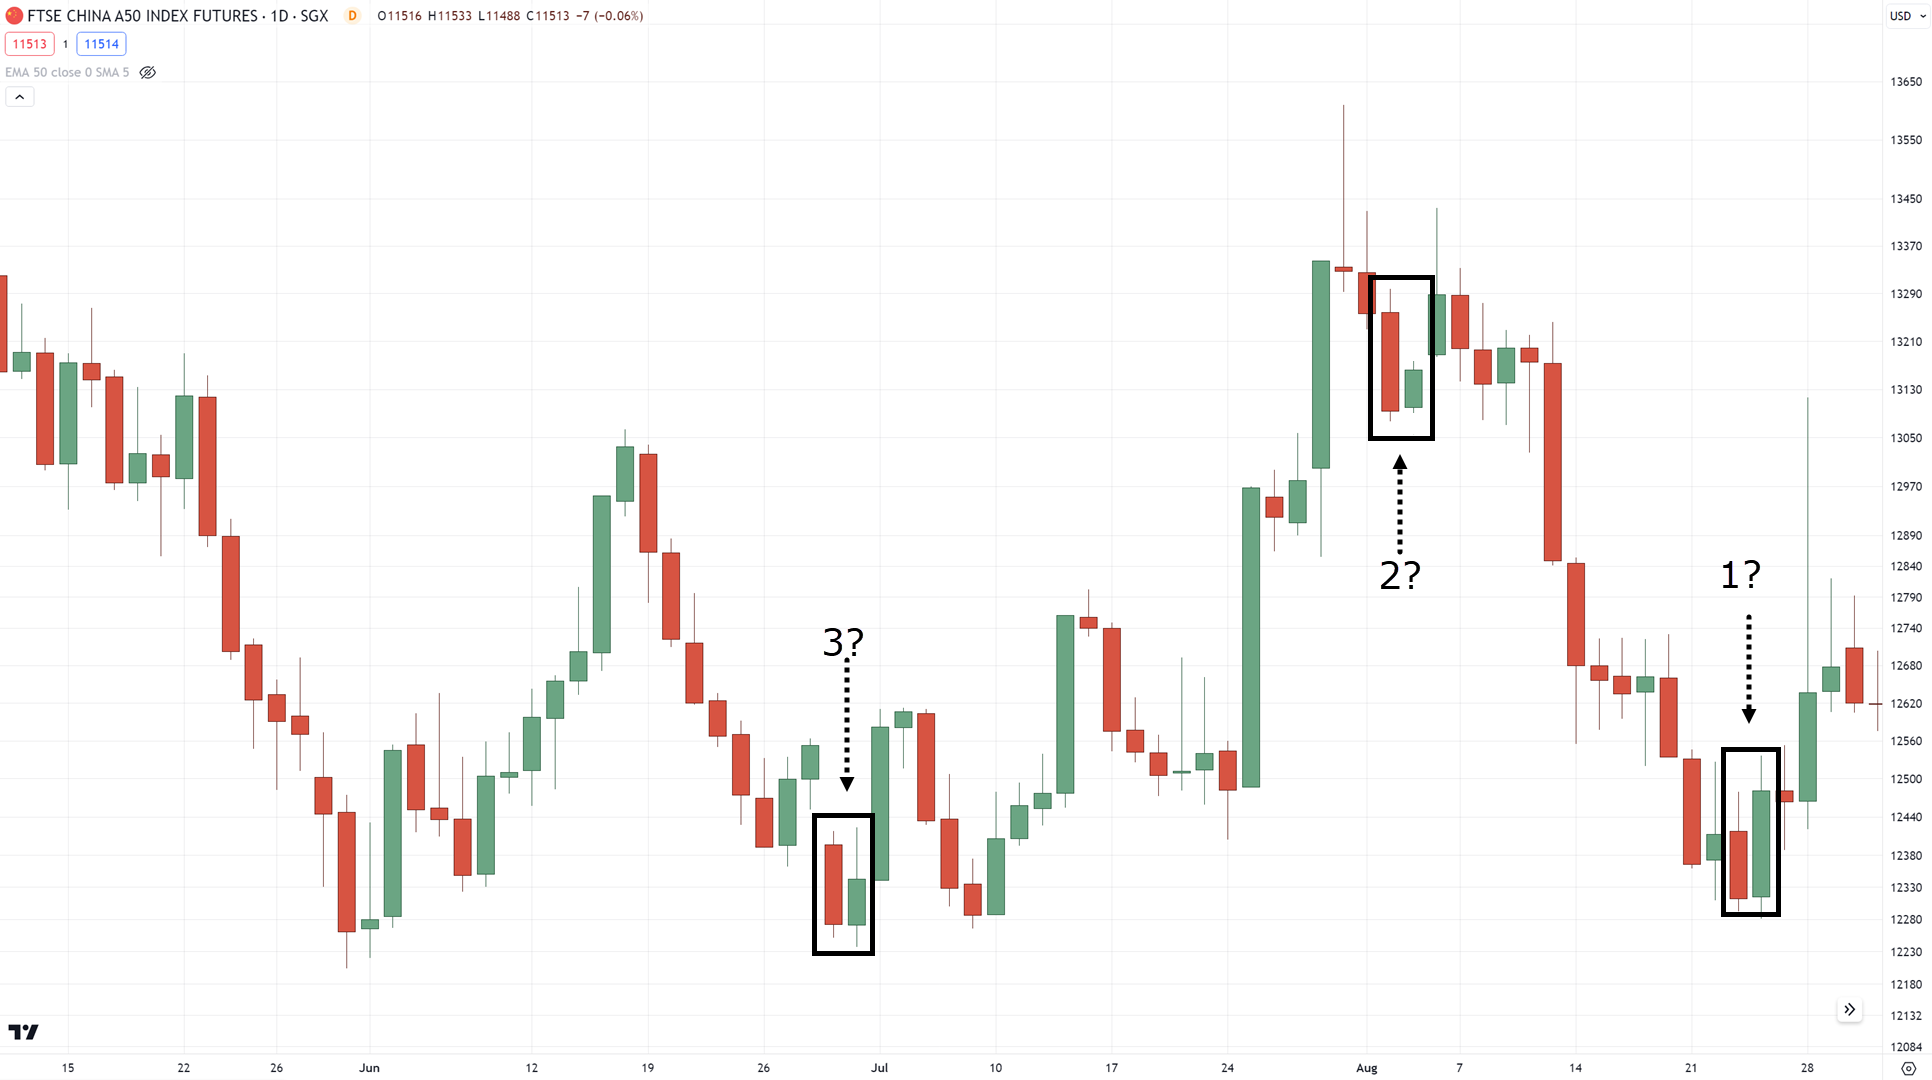
Which one of these candlesticks is piercing, inside, and engulfing?
If you’ve got the following answers:
- Bullish engulfing
- Inside bar
- Piercing pattern
Then you’re now ready for the next section!
Because now that you’ve nailed down how to spot a piercing pattern…
I’ll teach you how to use it to enter your trades accurately.
Ready?
Then let’s move on…
Why the piercing pattern is the most convenient candlestick pattern to enter the markets
Let me ask you…
How do you enter off of a candlestick pattern?
Because identifying them is one thing, trading them is another!
So, how do you trade them?
Market order
Let me explain…
Once you spot a valid bullish candlestick for example:
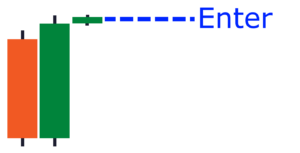
What you do is place a market order manually at the next candle open.
Simple as that!
We wait for the candlestick to form and we place a market order!
However, there’s a downside…
You’d have to wait for the candlestick to close and enter the trade manually
Sure, waiting for a candle to close can help you avoid false signals so you don’t enter prematurely.
However…
We can’t be on our screens all the time!
And this method makes it even harder for those who trade the lower timeframes!
So, how do we solve this?
Enter, the piercing pattern.
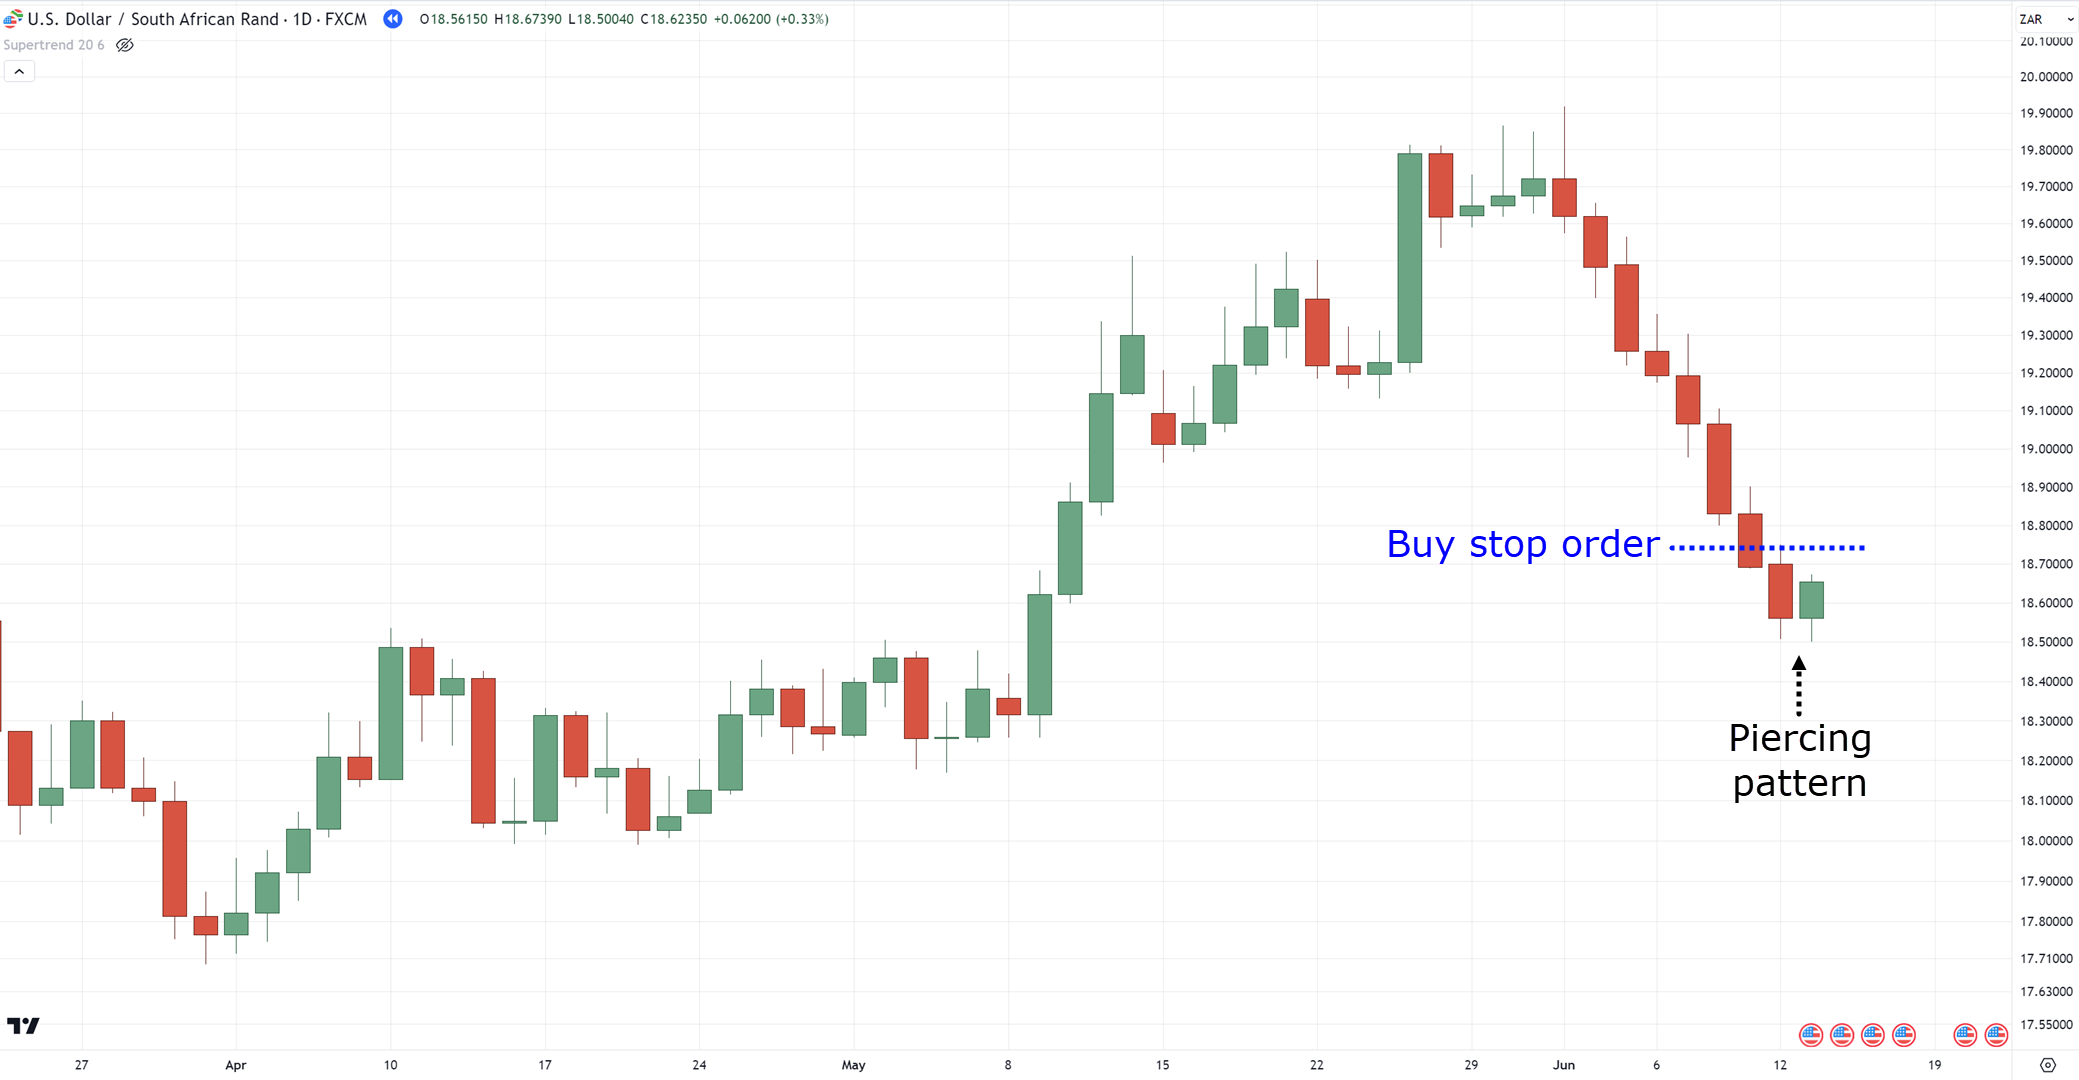
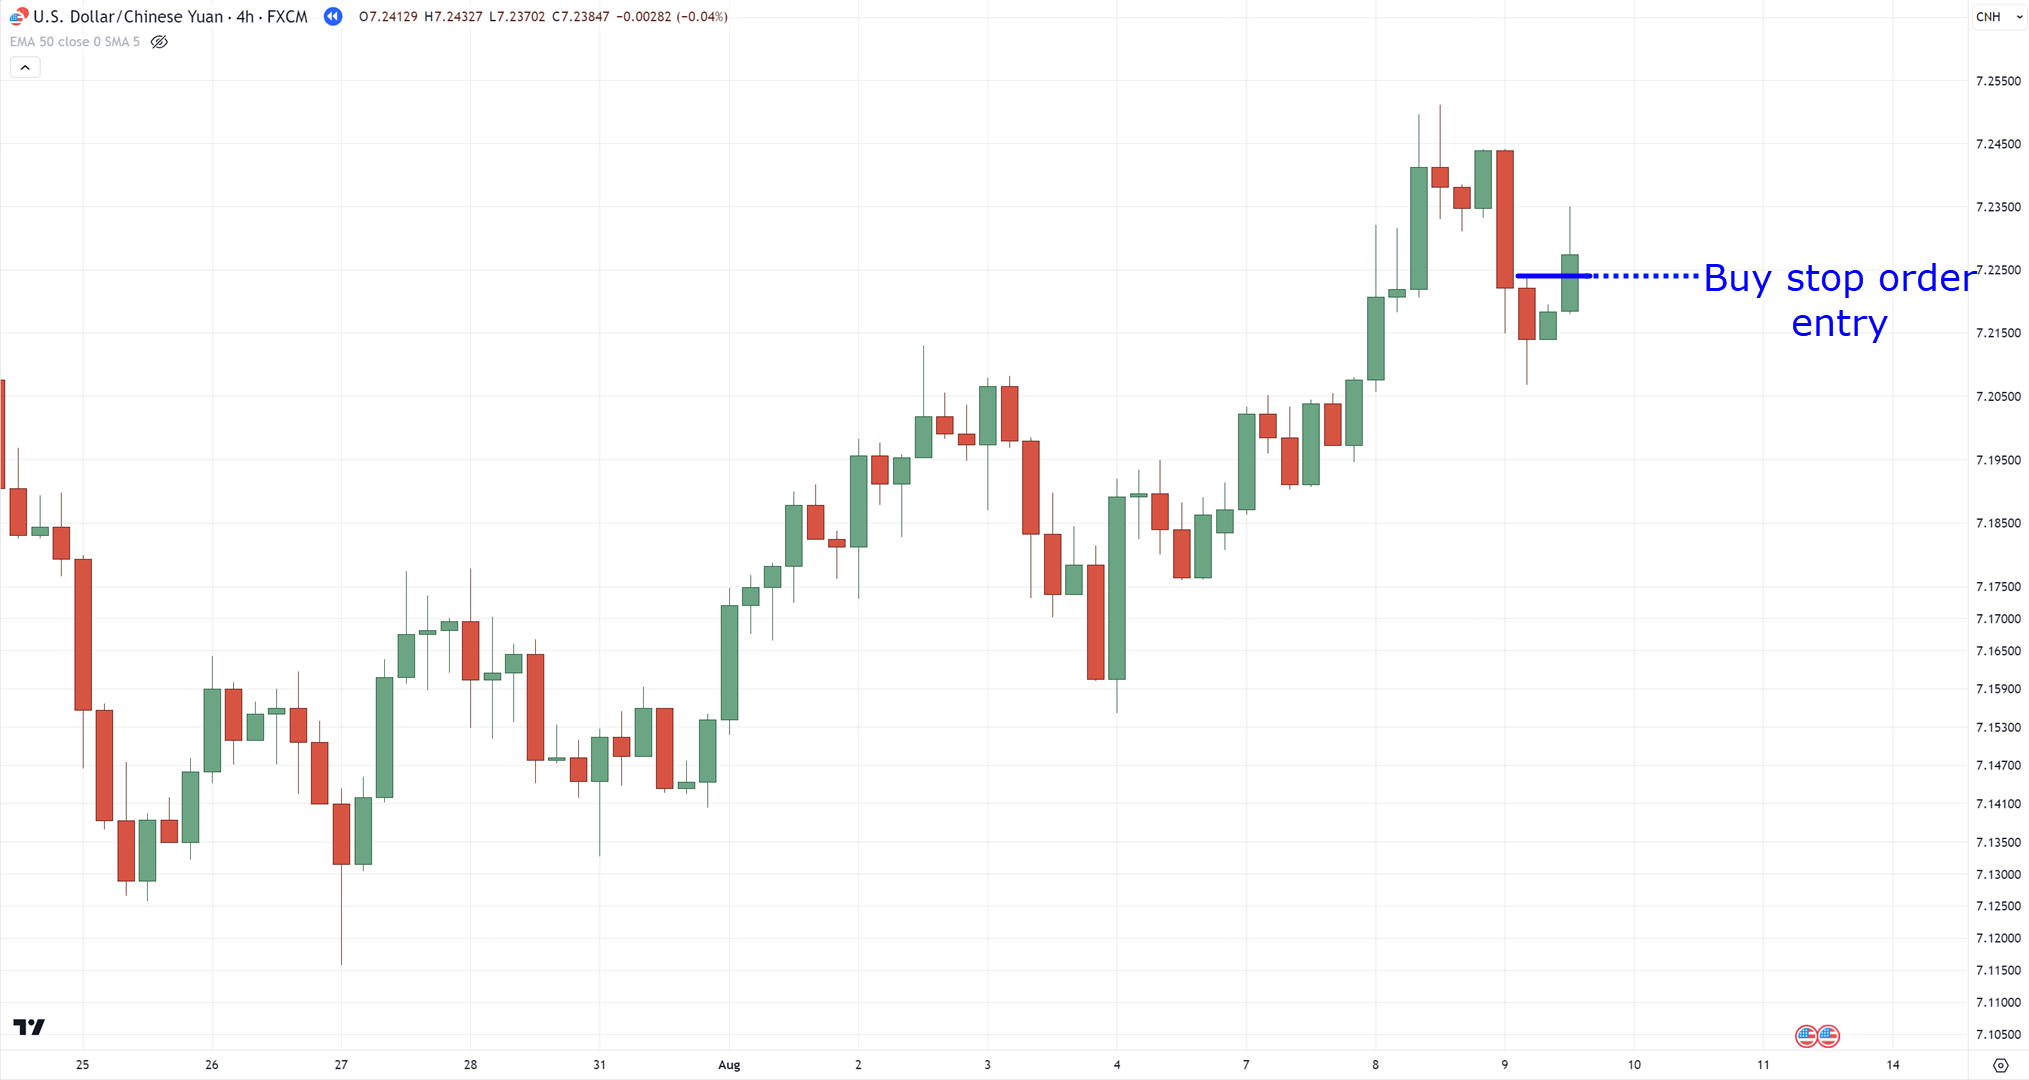
Buy stop order
Piercing offers the most flexibility.
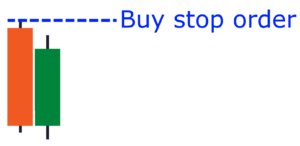
Because instead of placing a market order, we’d be placing a buy-stop order!
Here’s what I mean:
That’s right.
You’d want the piercing pattern committed to you.
So, once you’ve spotted a valid piercing pattern:
You place a buy-stop order right above the previous candlestick!
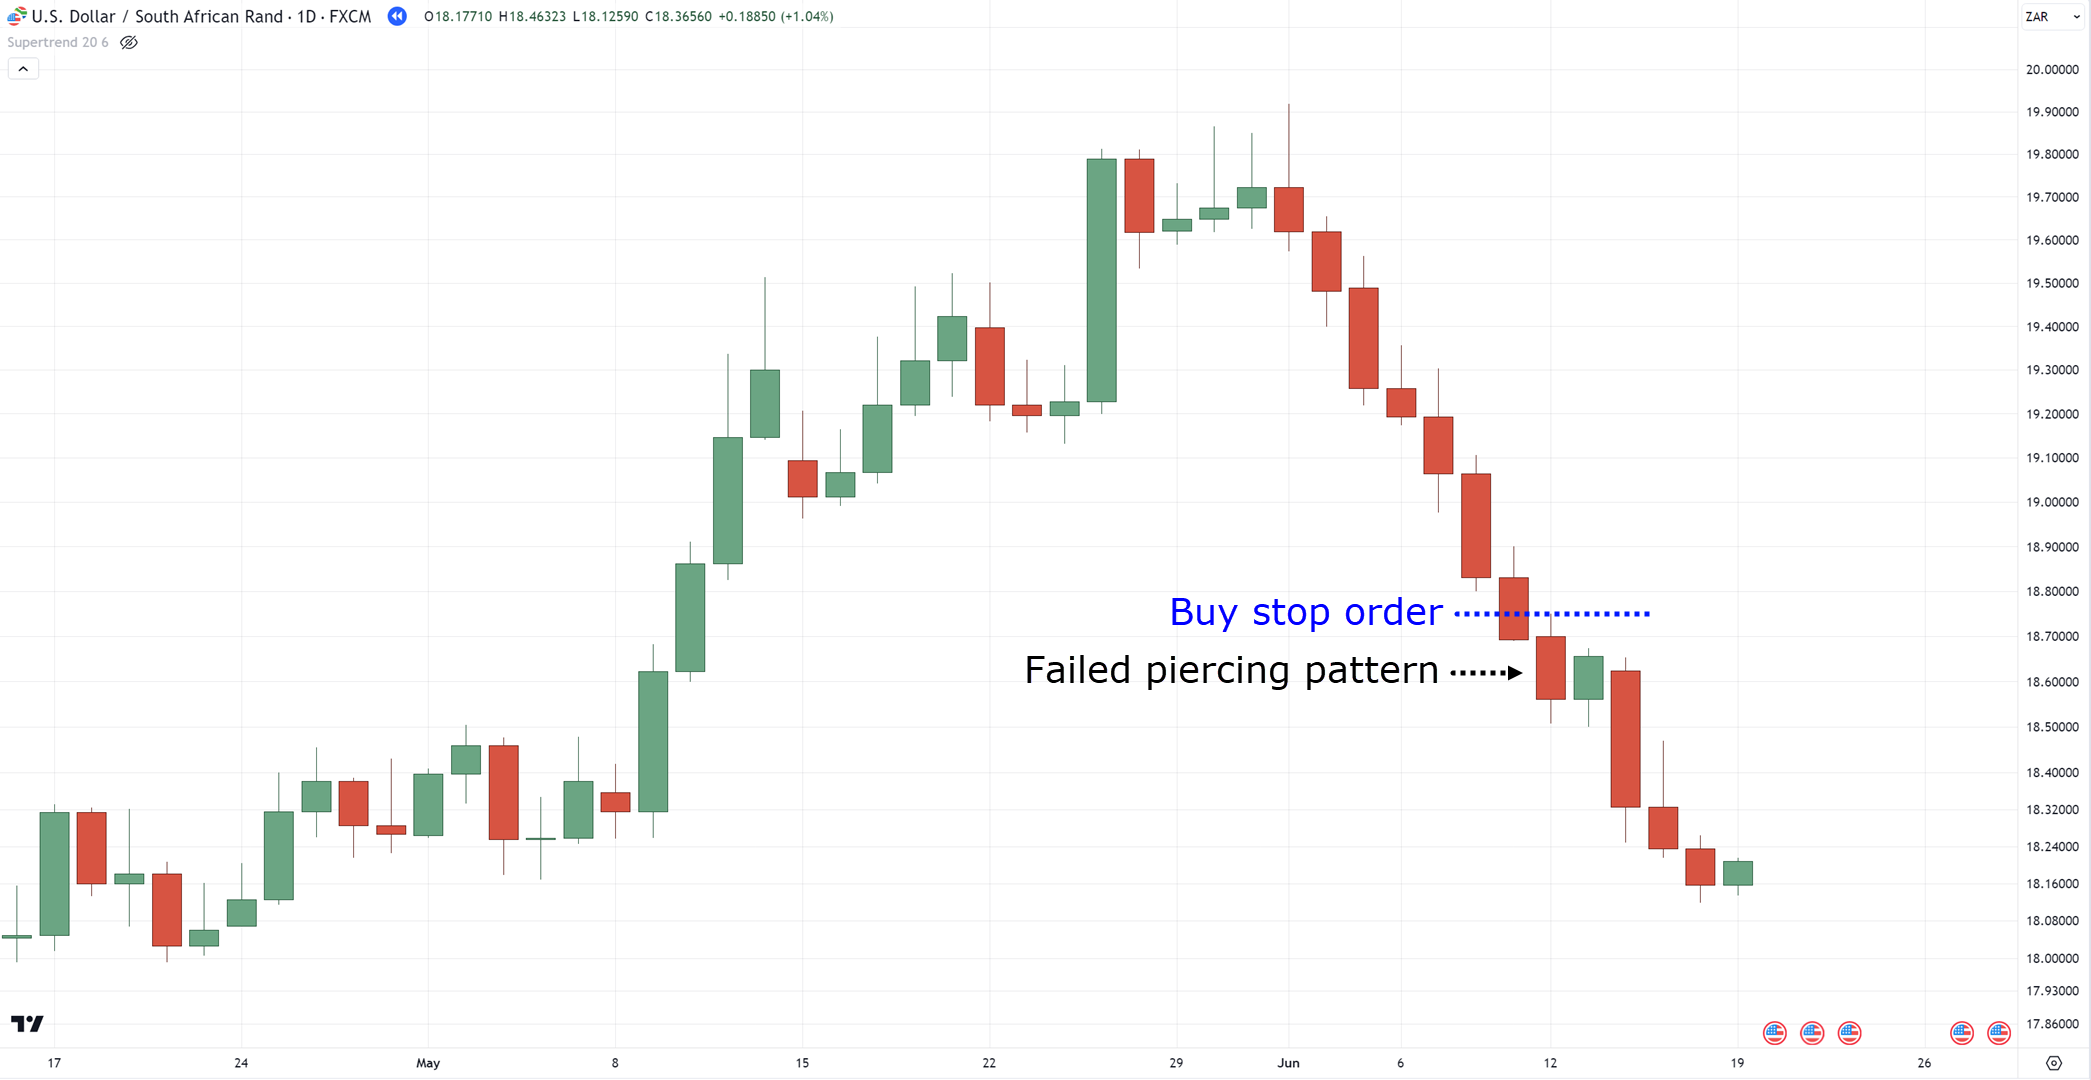
But here’s the thing…
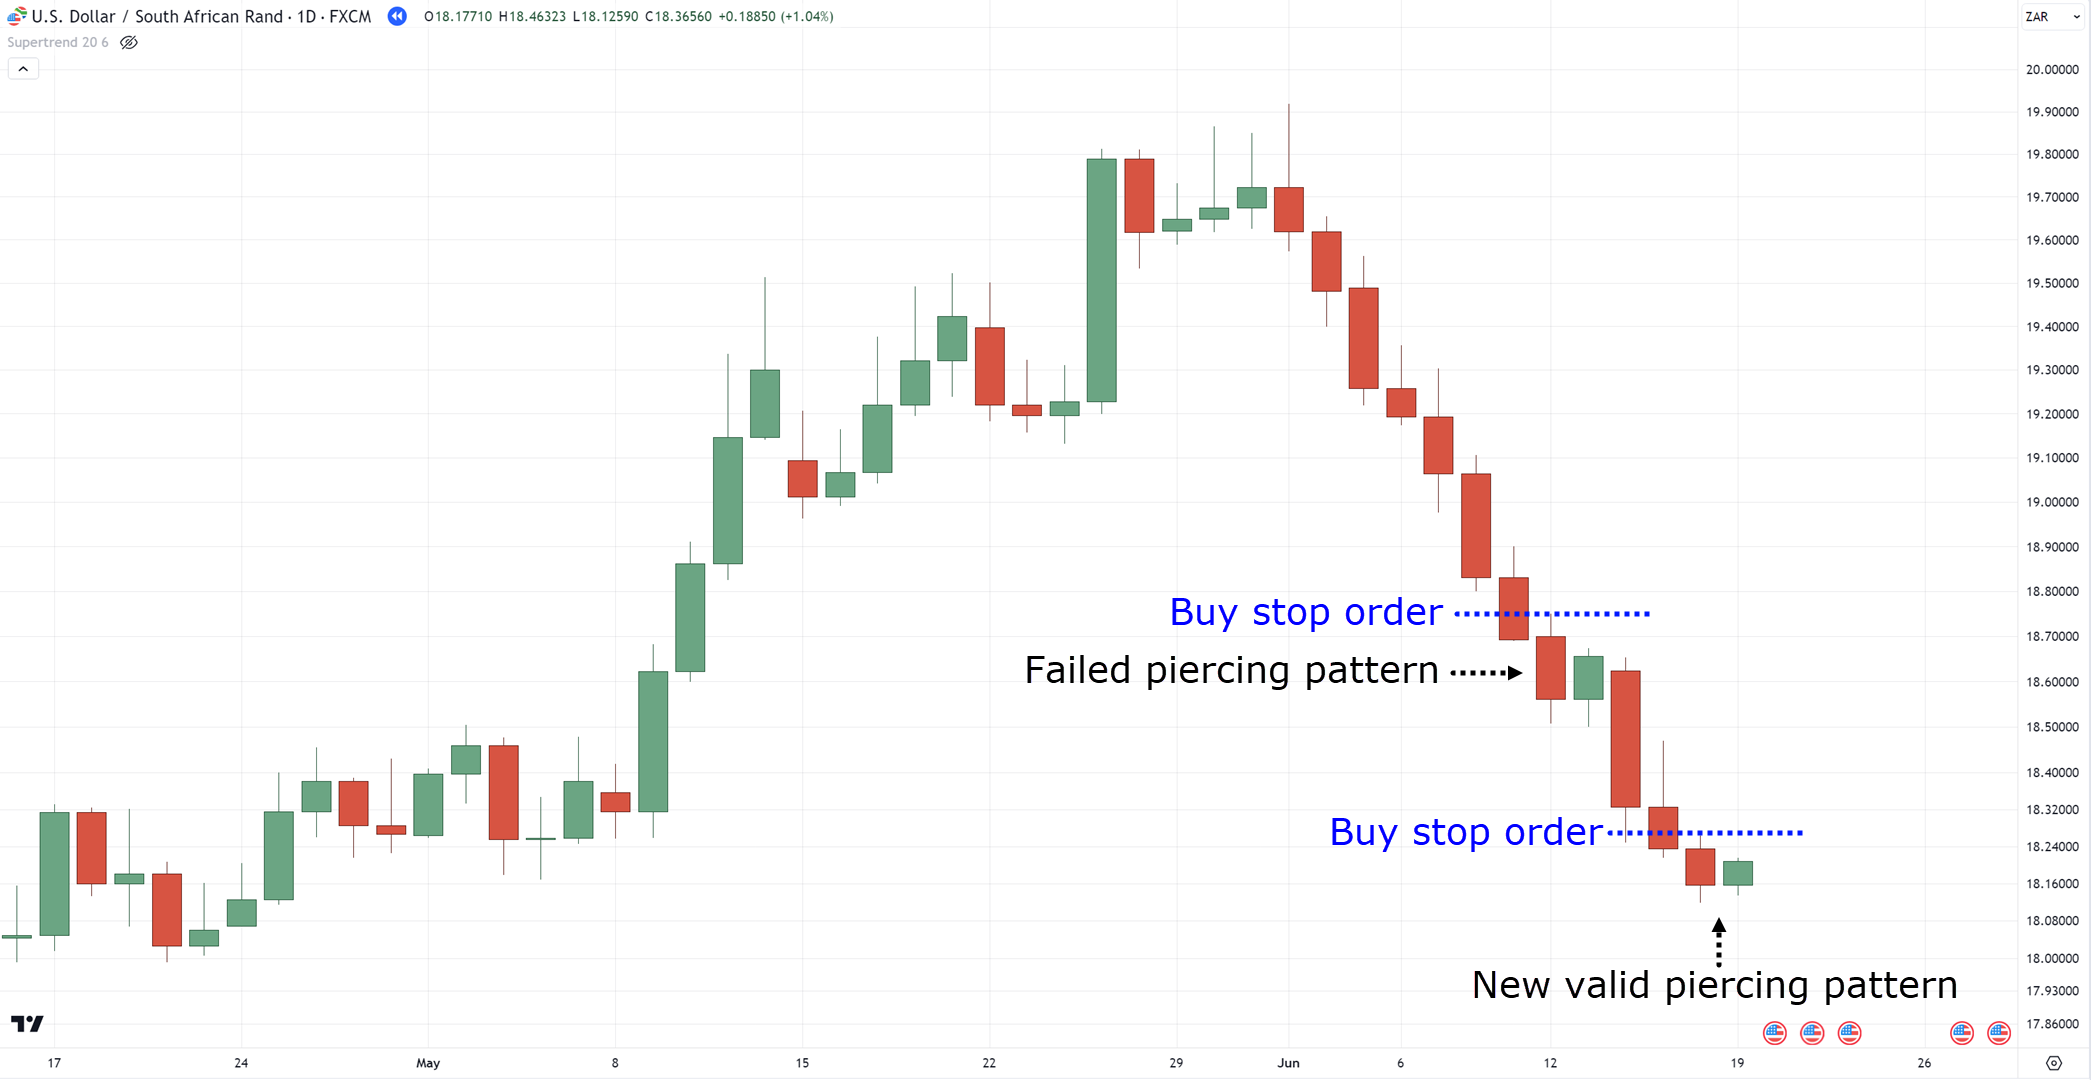
What if the market kept going lower without hitting your stop order?
Simple!
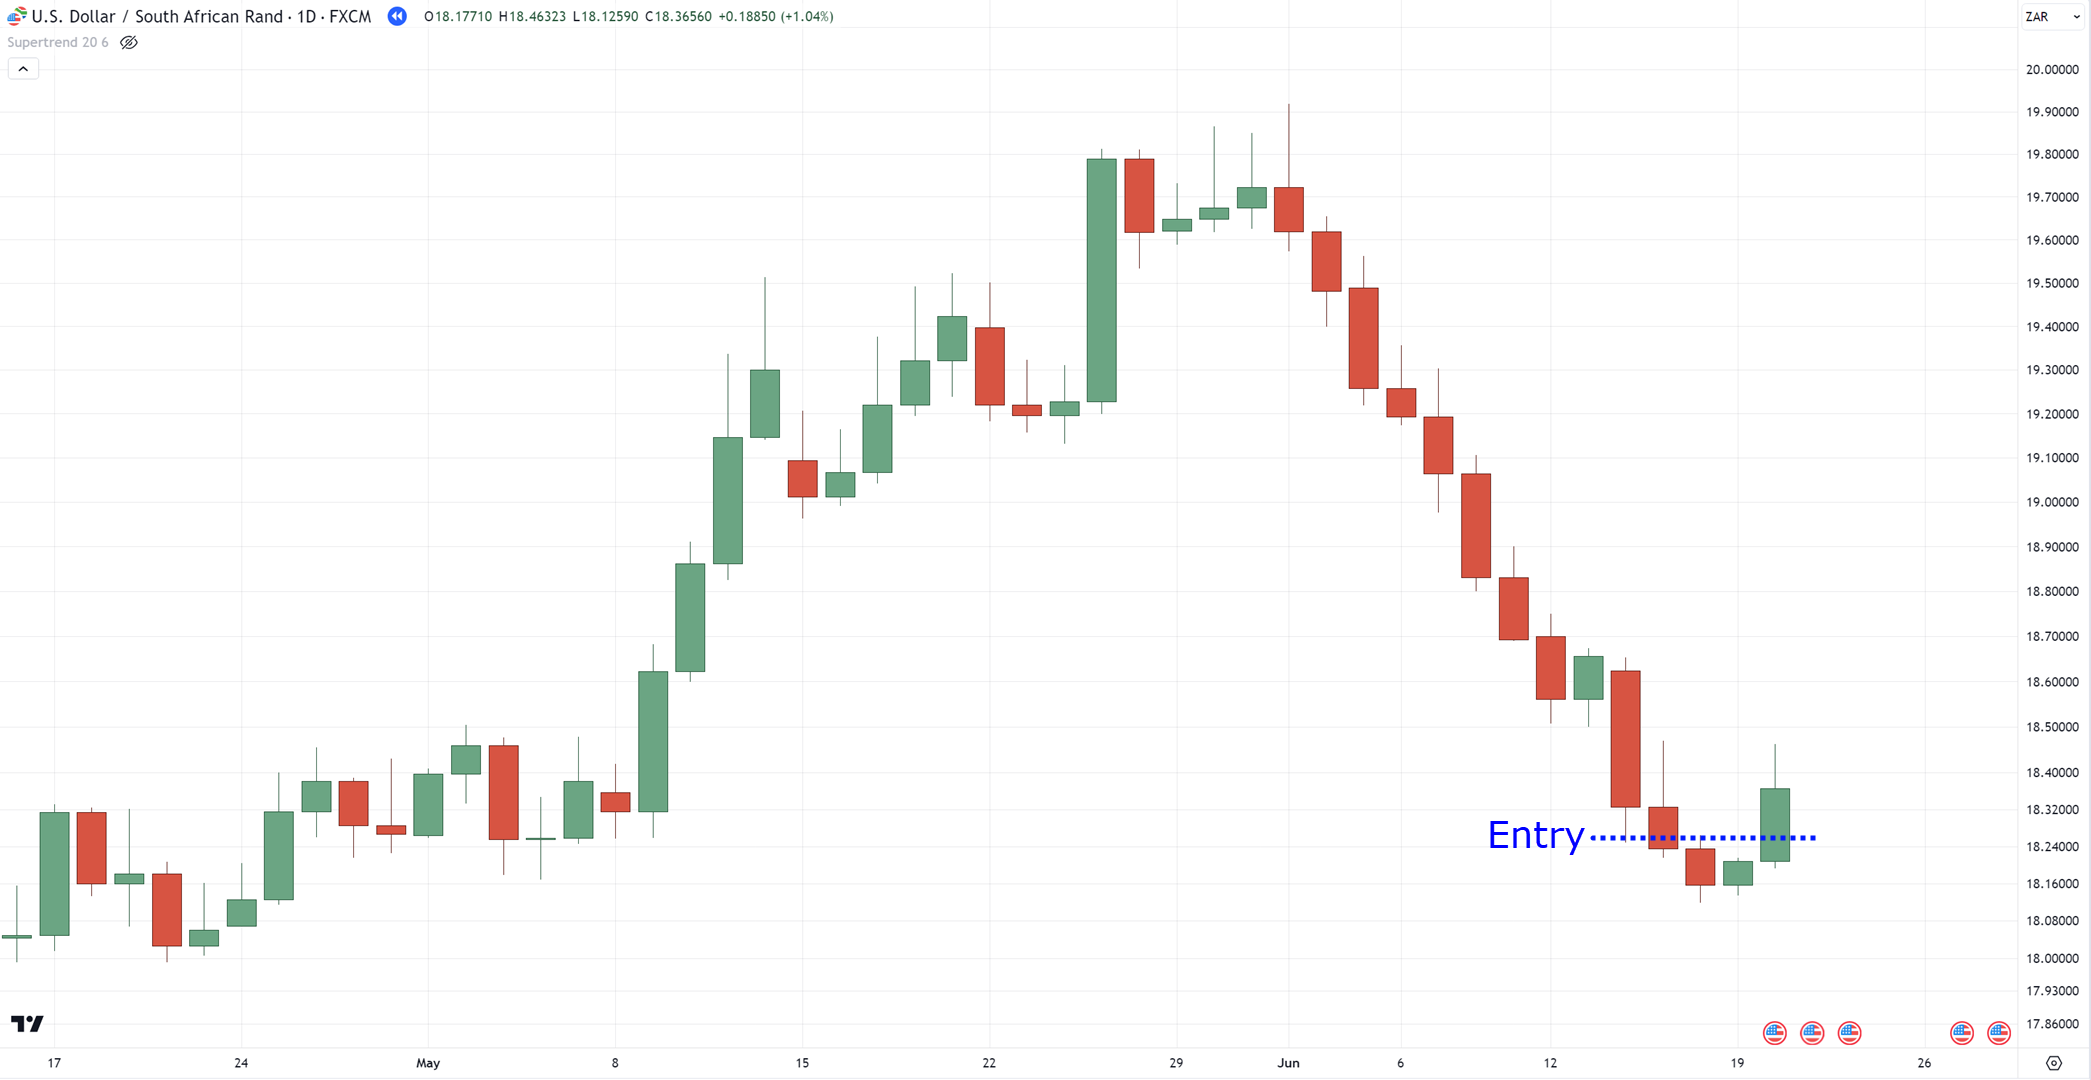
Just keep shifting your buy-stop order, therefore, you get an even better entry price!
Until it gets triggered…
P.S. Only shift your buy-stop order lower only when you spot a valid piercing pattern again!
Now here’s another question that’s important to answer…
How long is your buy-stop valid?
Here’s the tricky part.
But the answer is this:
When the piercing pattern is no longer at an area of value:
Let me tell you more in the next section…
A step-by-step framework for trading the piercing pattern
Entries are only a small part of a trading plan.
Do you agree?
(Say yes)
Good, you agree!
One mistake candlestick pattern traders often make is that they rely too much on candlestick patterns!
But the truth is, a single candlestick pattern won’t dictate a market direction.
It’s the whole market structure itself!
So, how can we use market structures to our advantage?
At the same time…
Complimenting what you’ve learned thus far with the piercing pattern?
The M.A.E.E. formula
This simple framework will save your trading portfolio!
But, what does it mean?
It stands for four things…
- Market structure
- Area of value
- Entries
- Exits
So, how do we integrate the piercing pattern into this framework?
Let me teach you…
Step #1: Identify the market structure
This part is pretty important.
Why?
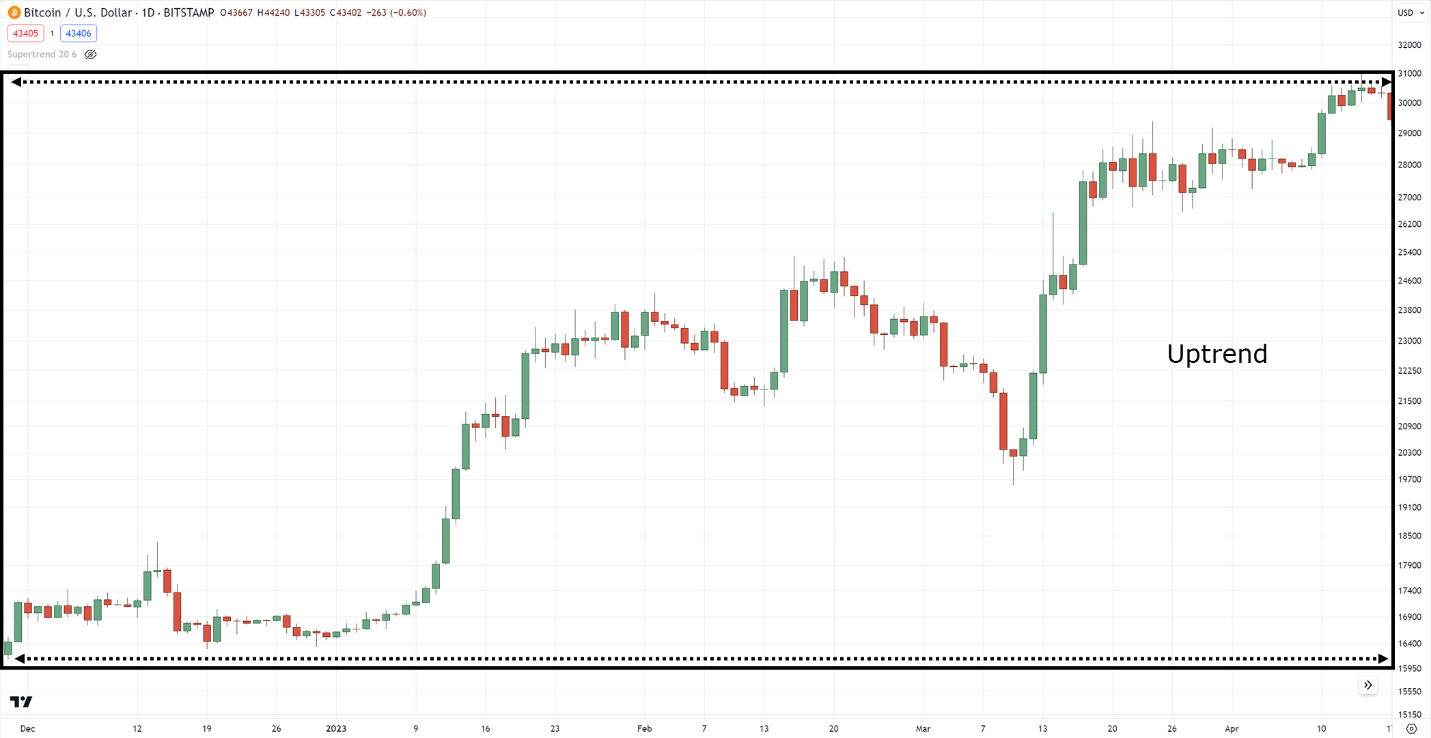
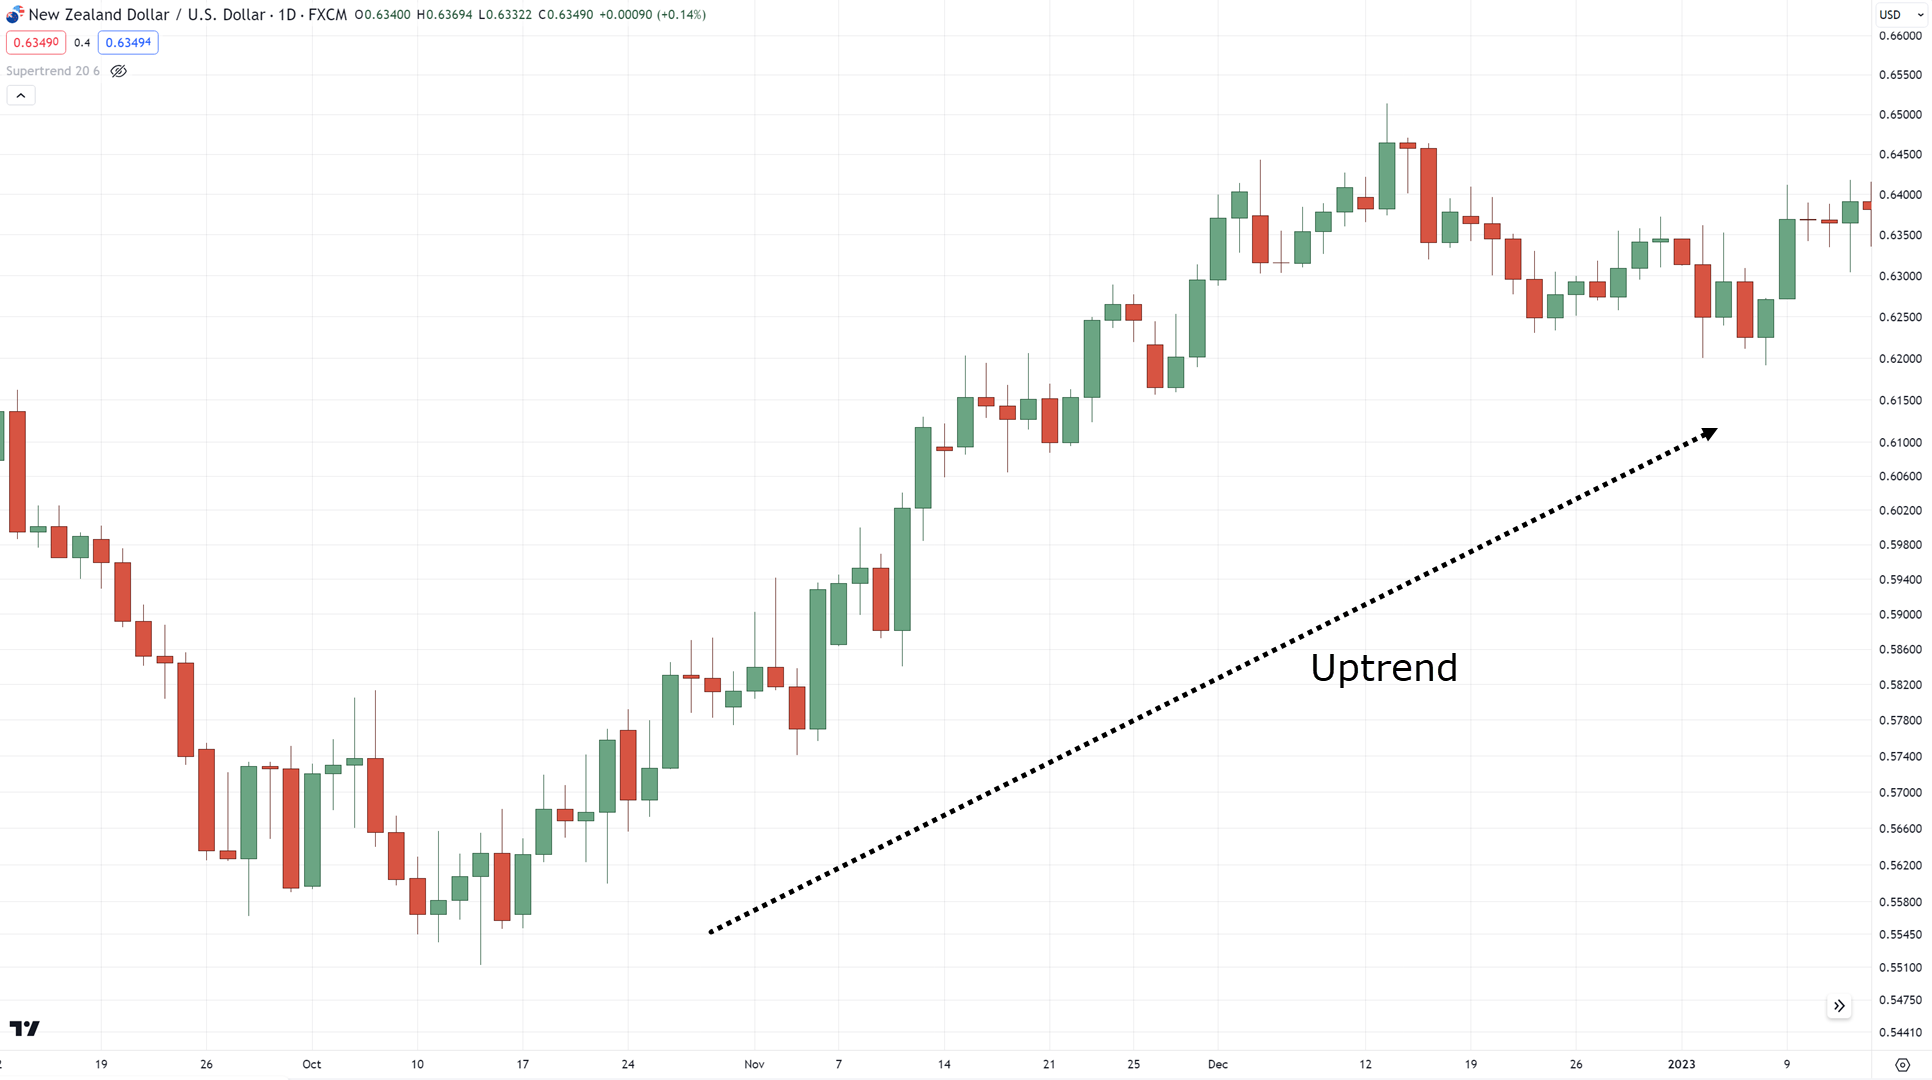
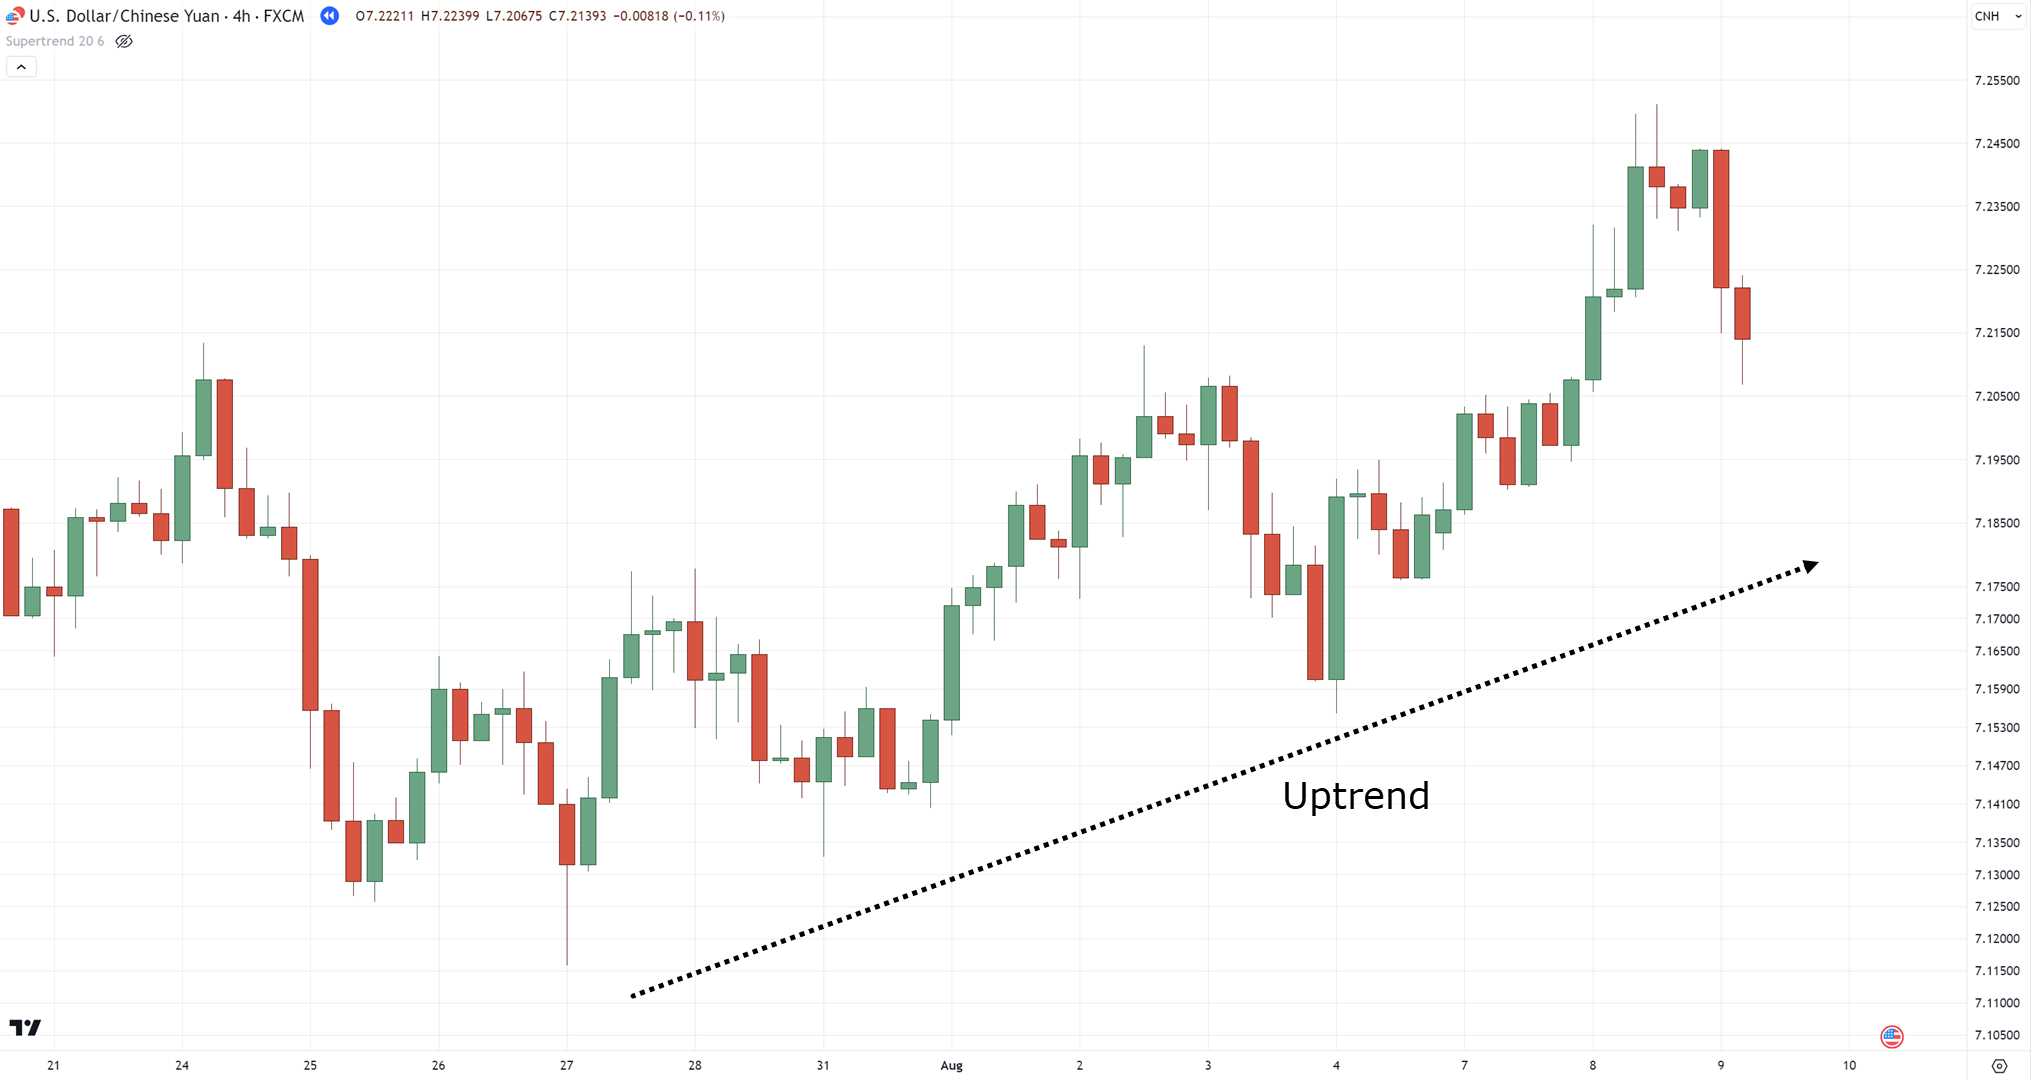
Because if you spot a nice uptrend:
Then you’d want to look for bullish piercing pattern setups to hop into the uptrend.
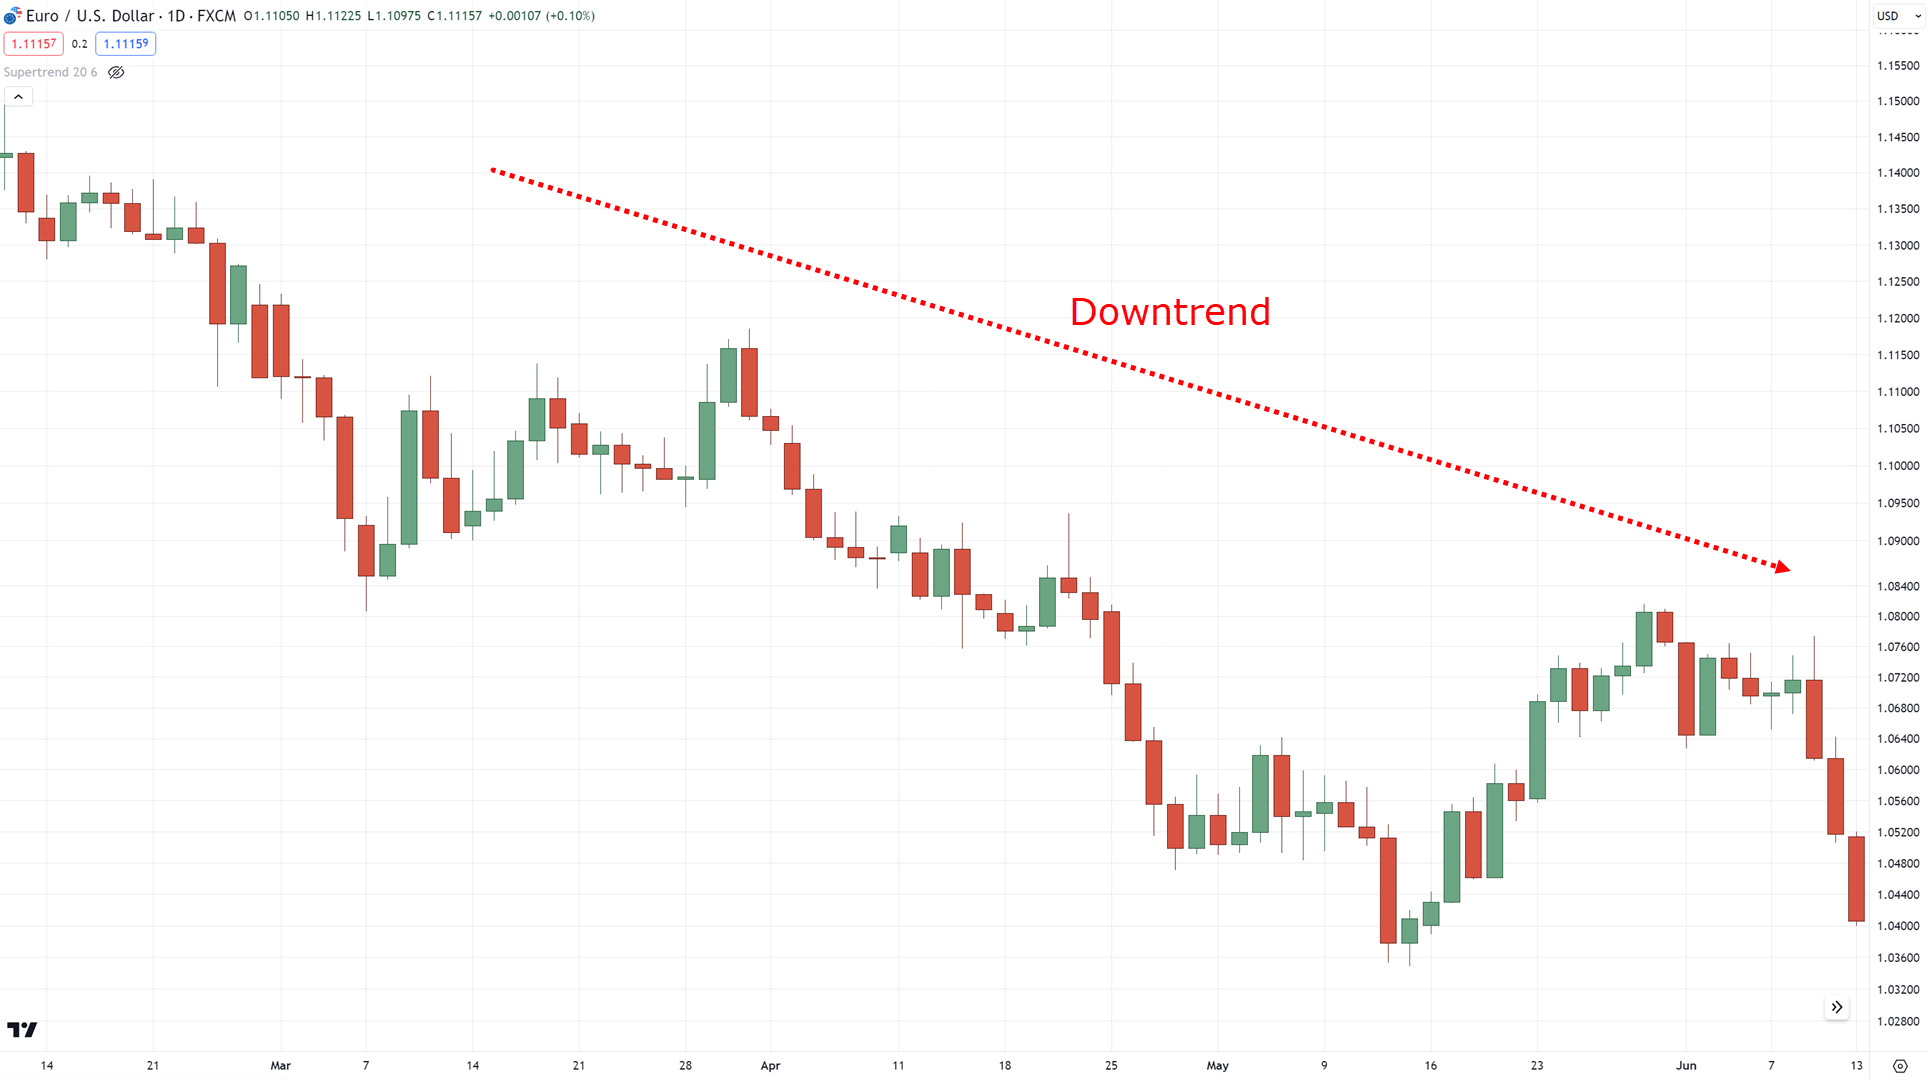
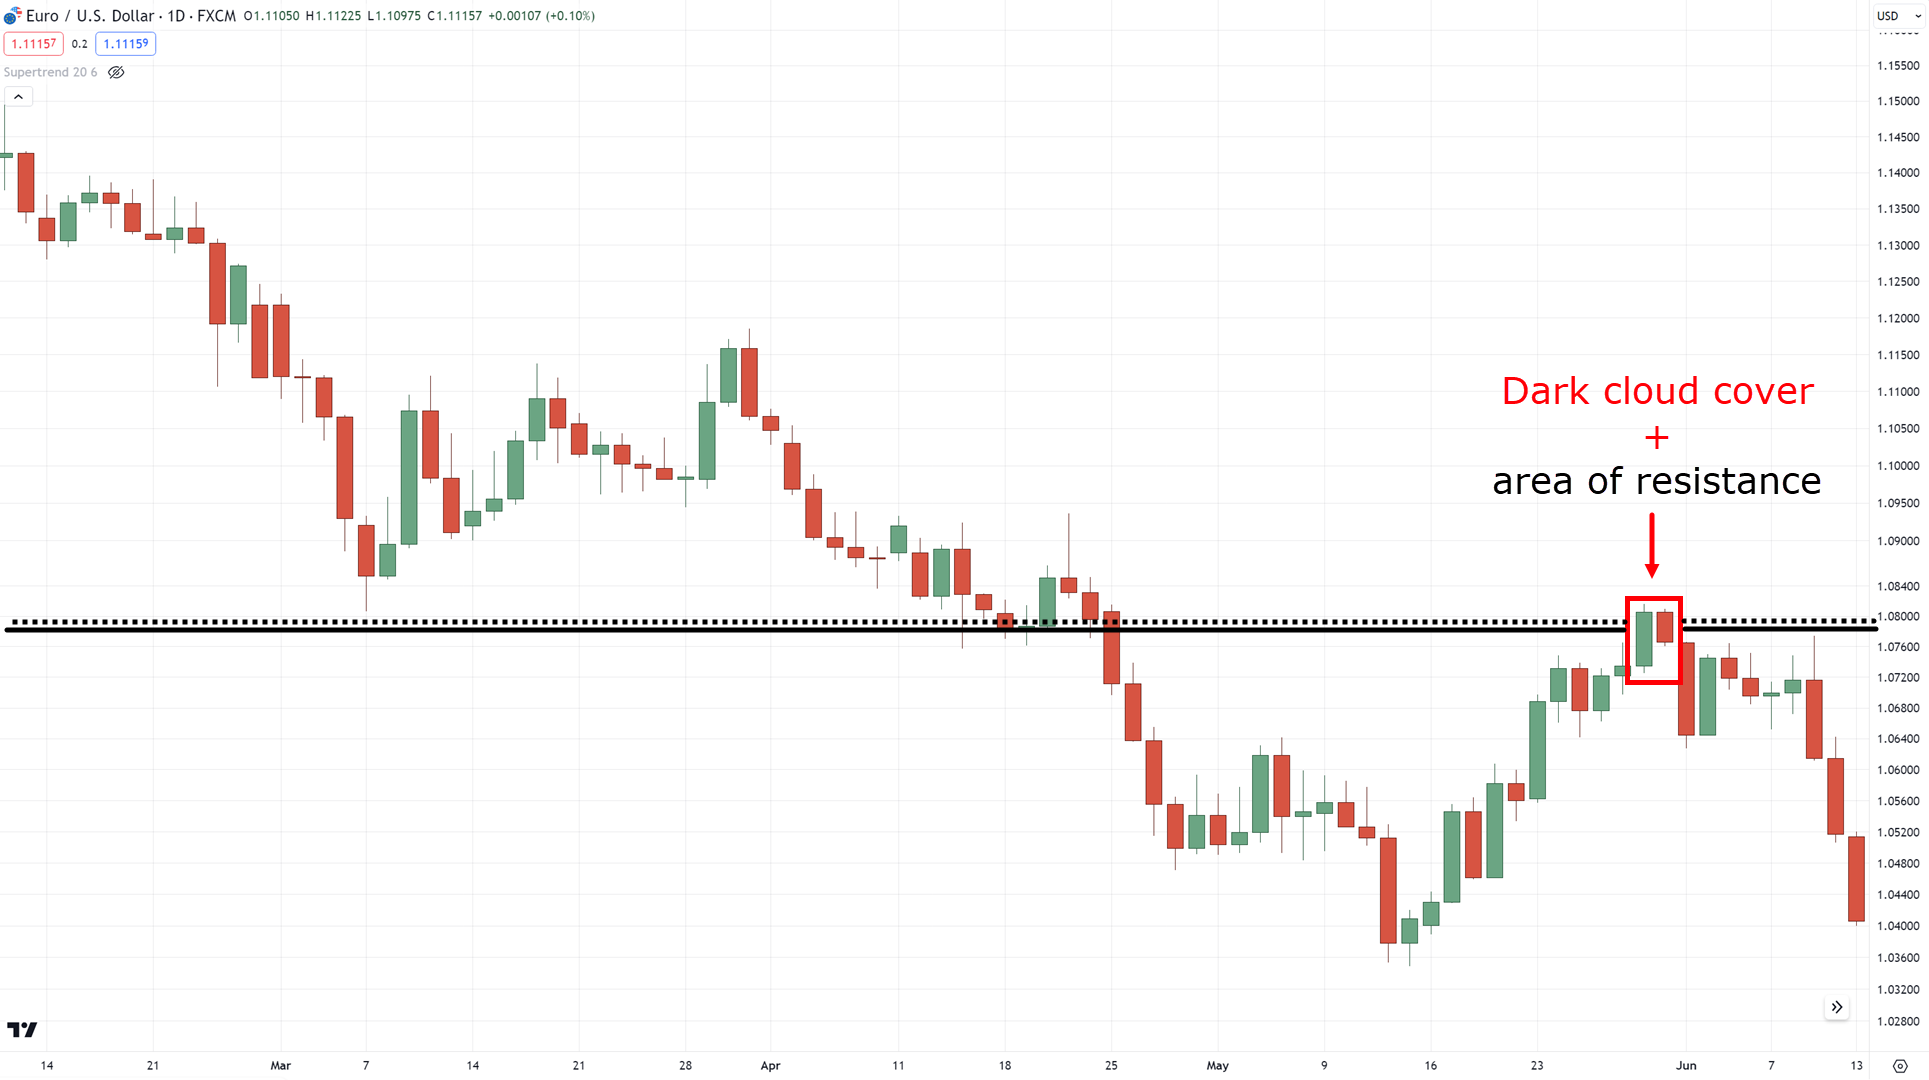
If you spot a downtrend:
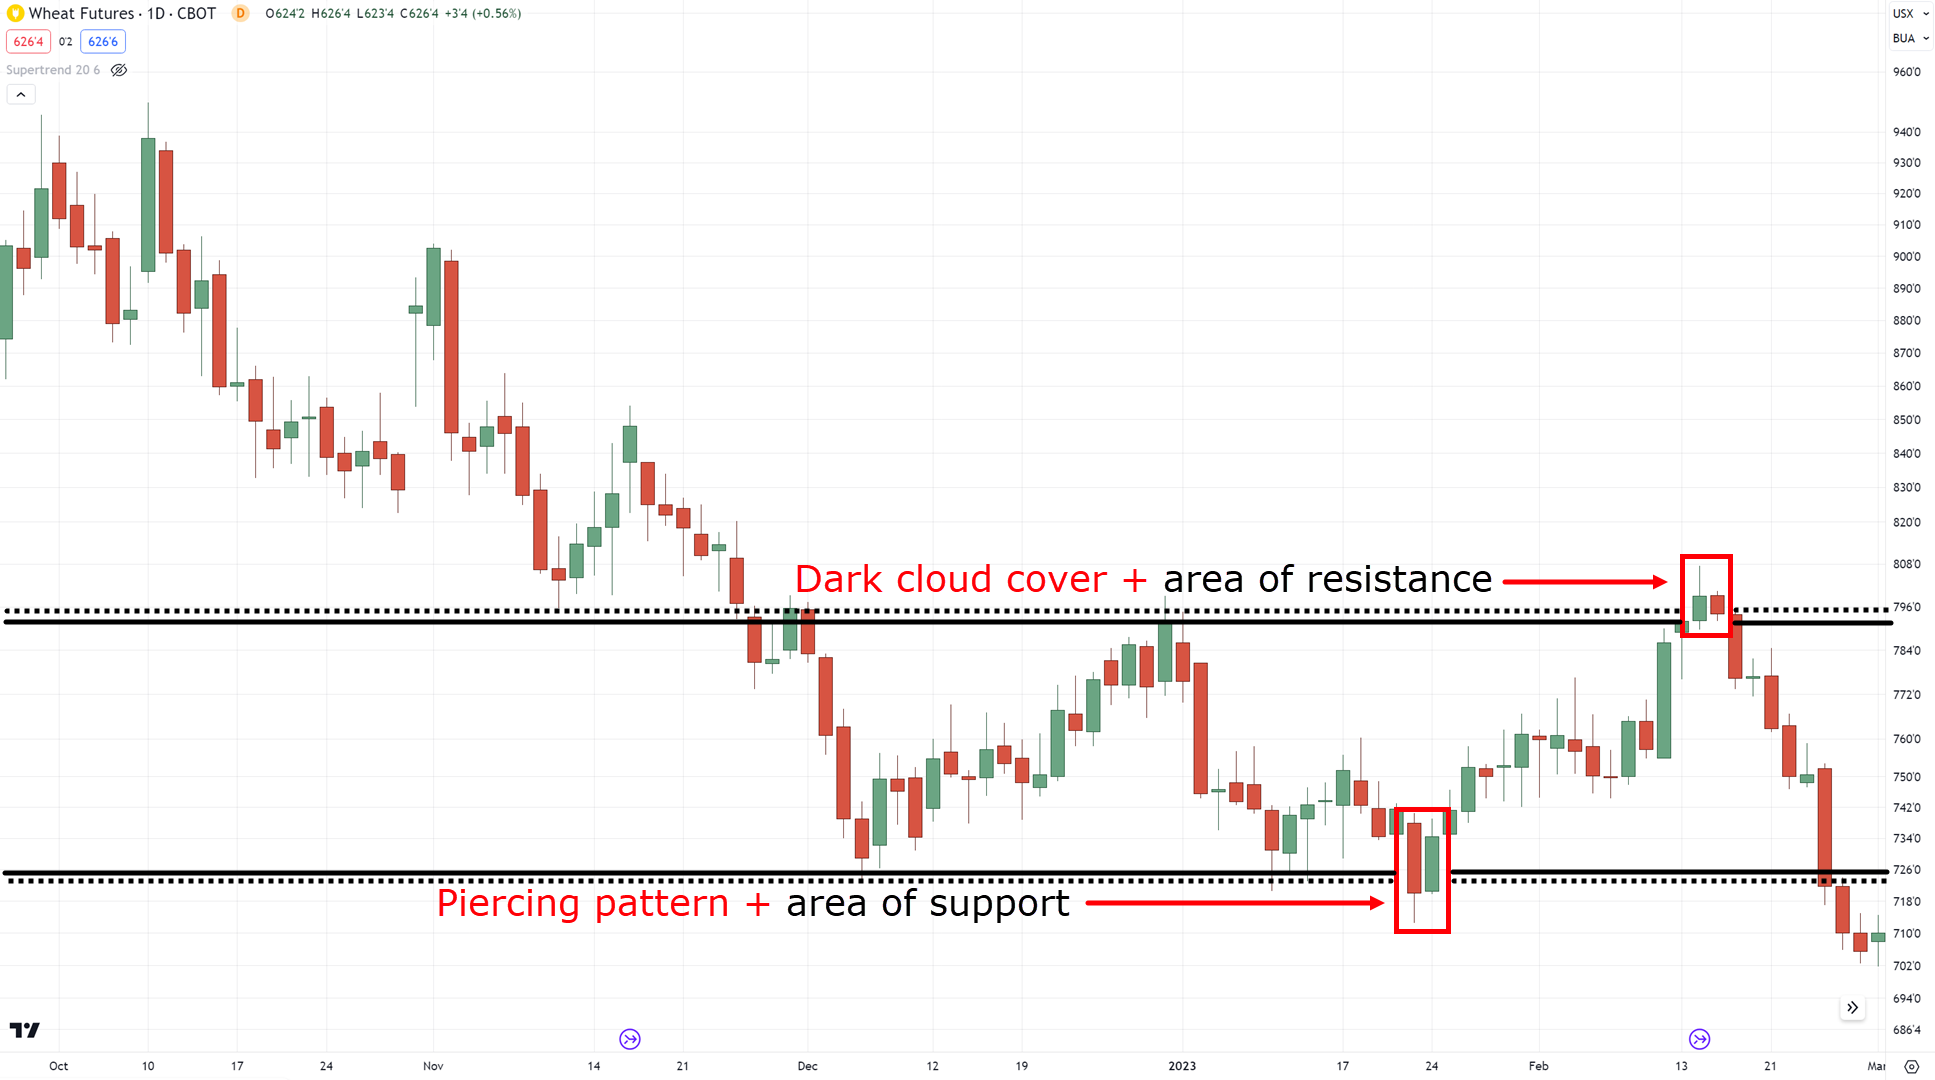
A dark cloud cover setup is the opposite of the piercing pattern!
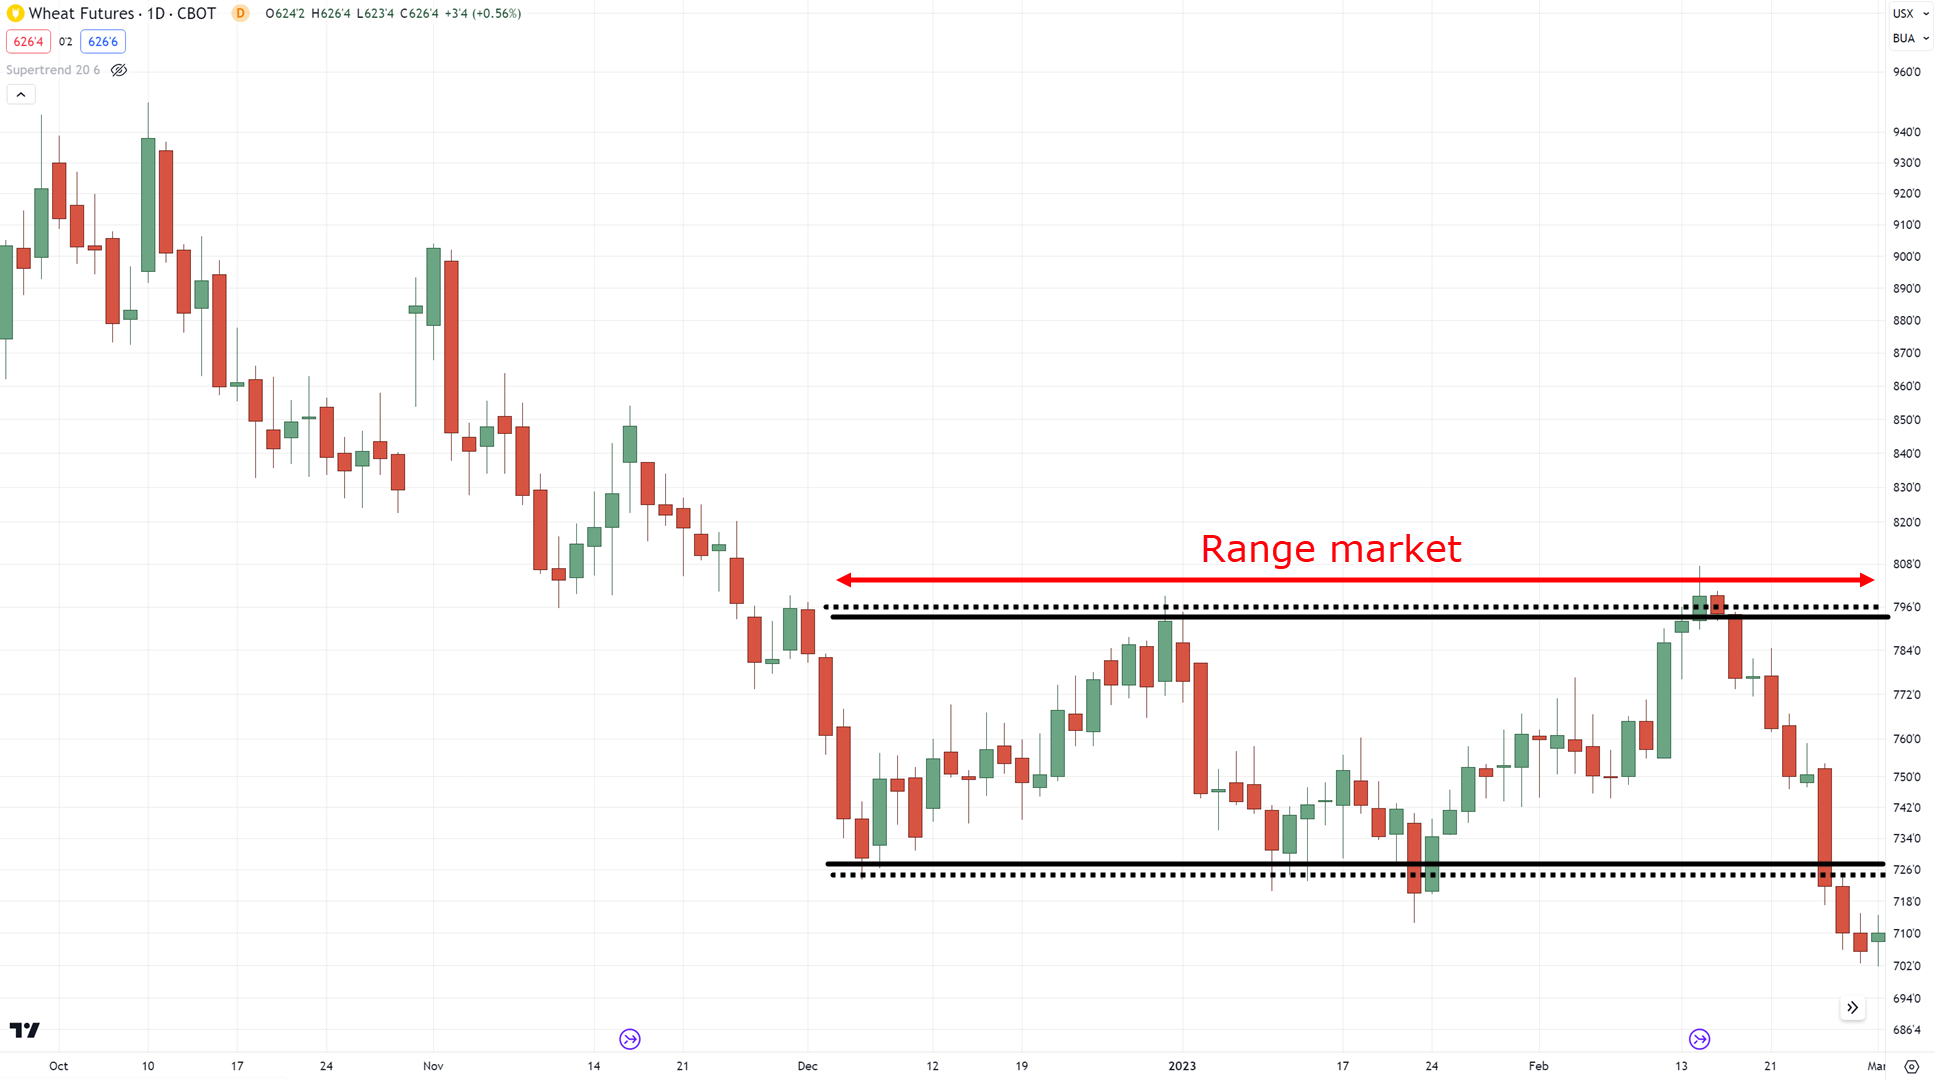
And if it’s a range:
Then look for both piercing pattern setups but only when they are at the highs and lows of a range:
Makes sense?
But for the next steps, we’ll use an uptrend as our example:
Next…
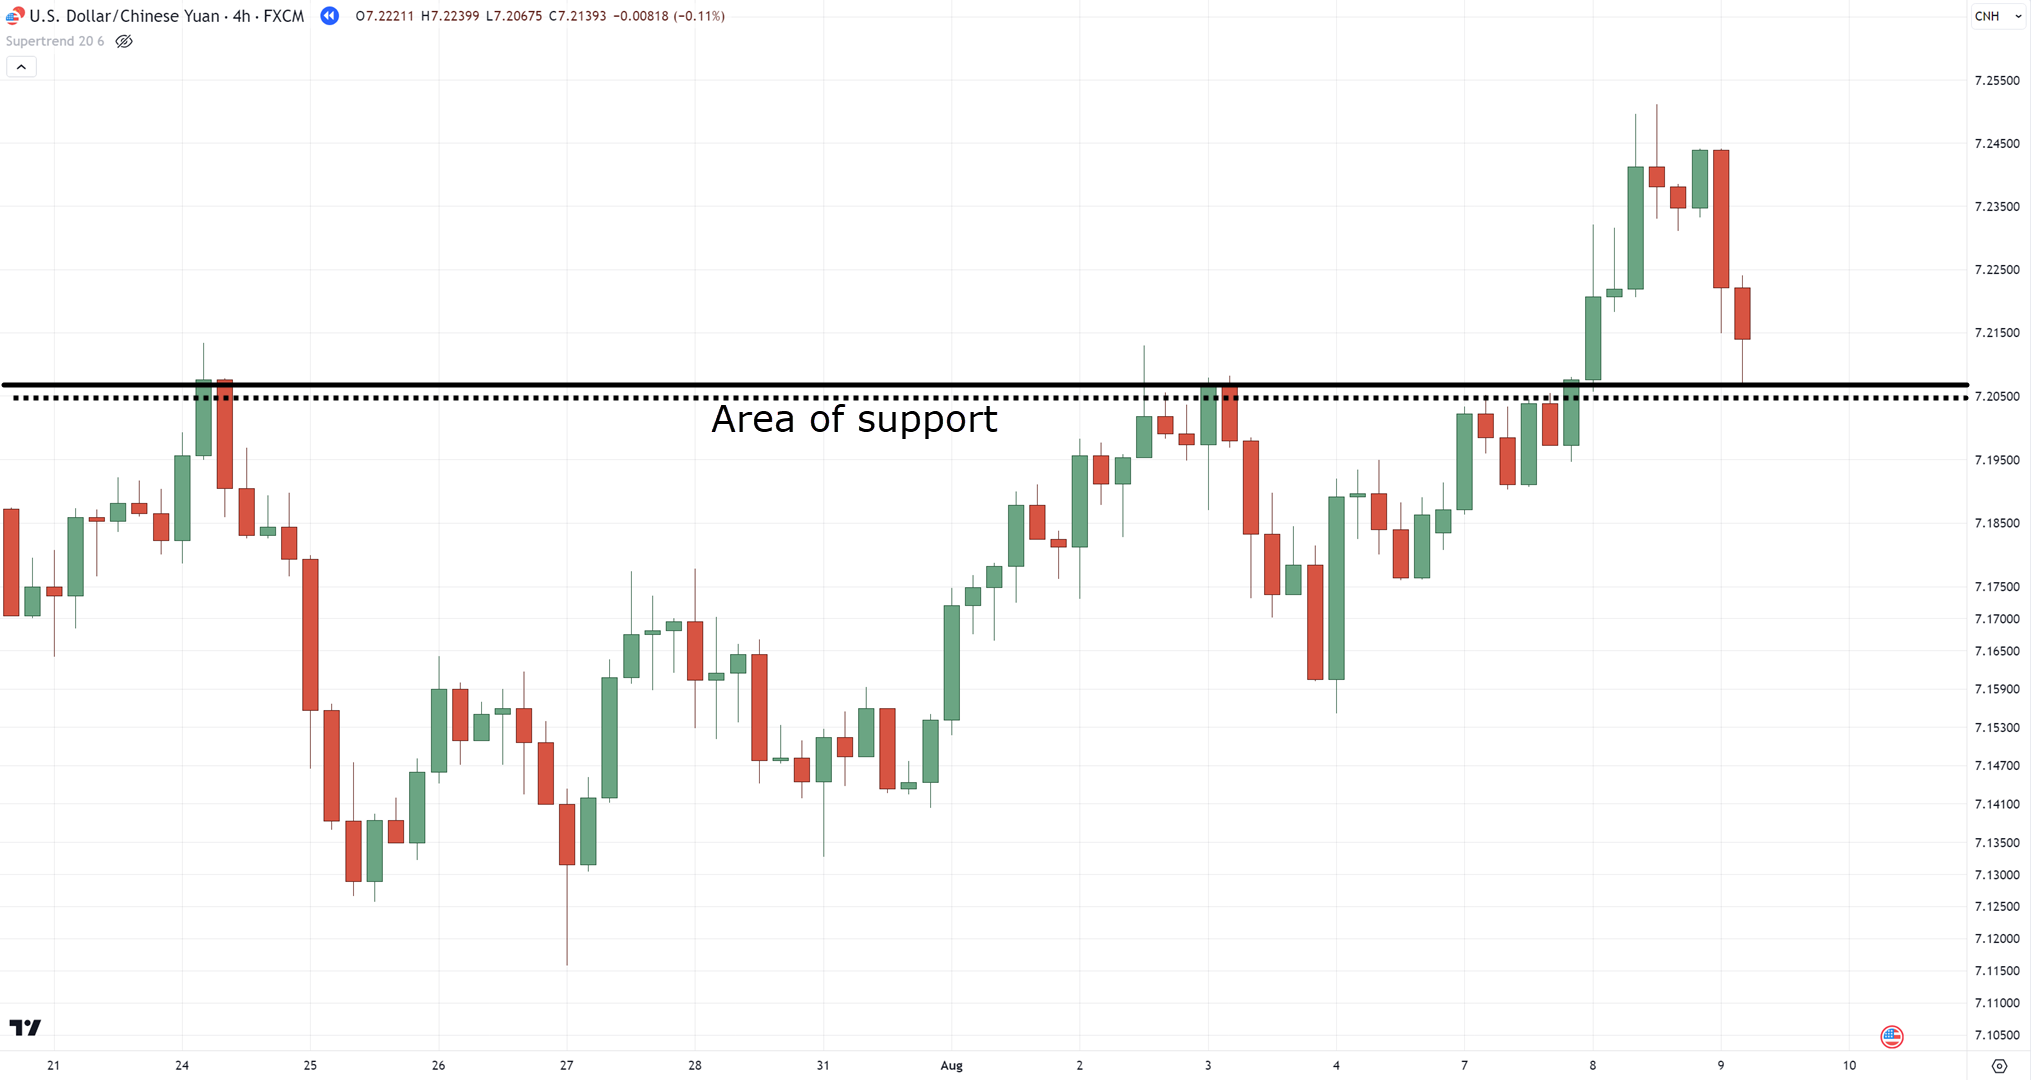
Step #2: Identify the area of value
This is ultimately the bread and butter of the piercing pattern.
Why?
Because any candlestick should never be traded in isolation!
That’s why it’s crucial to always identify an area of value.
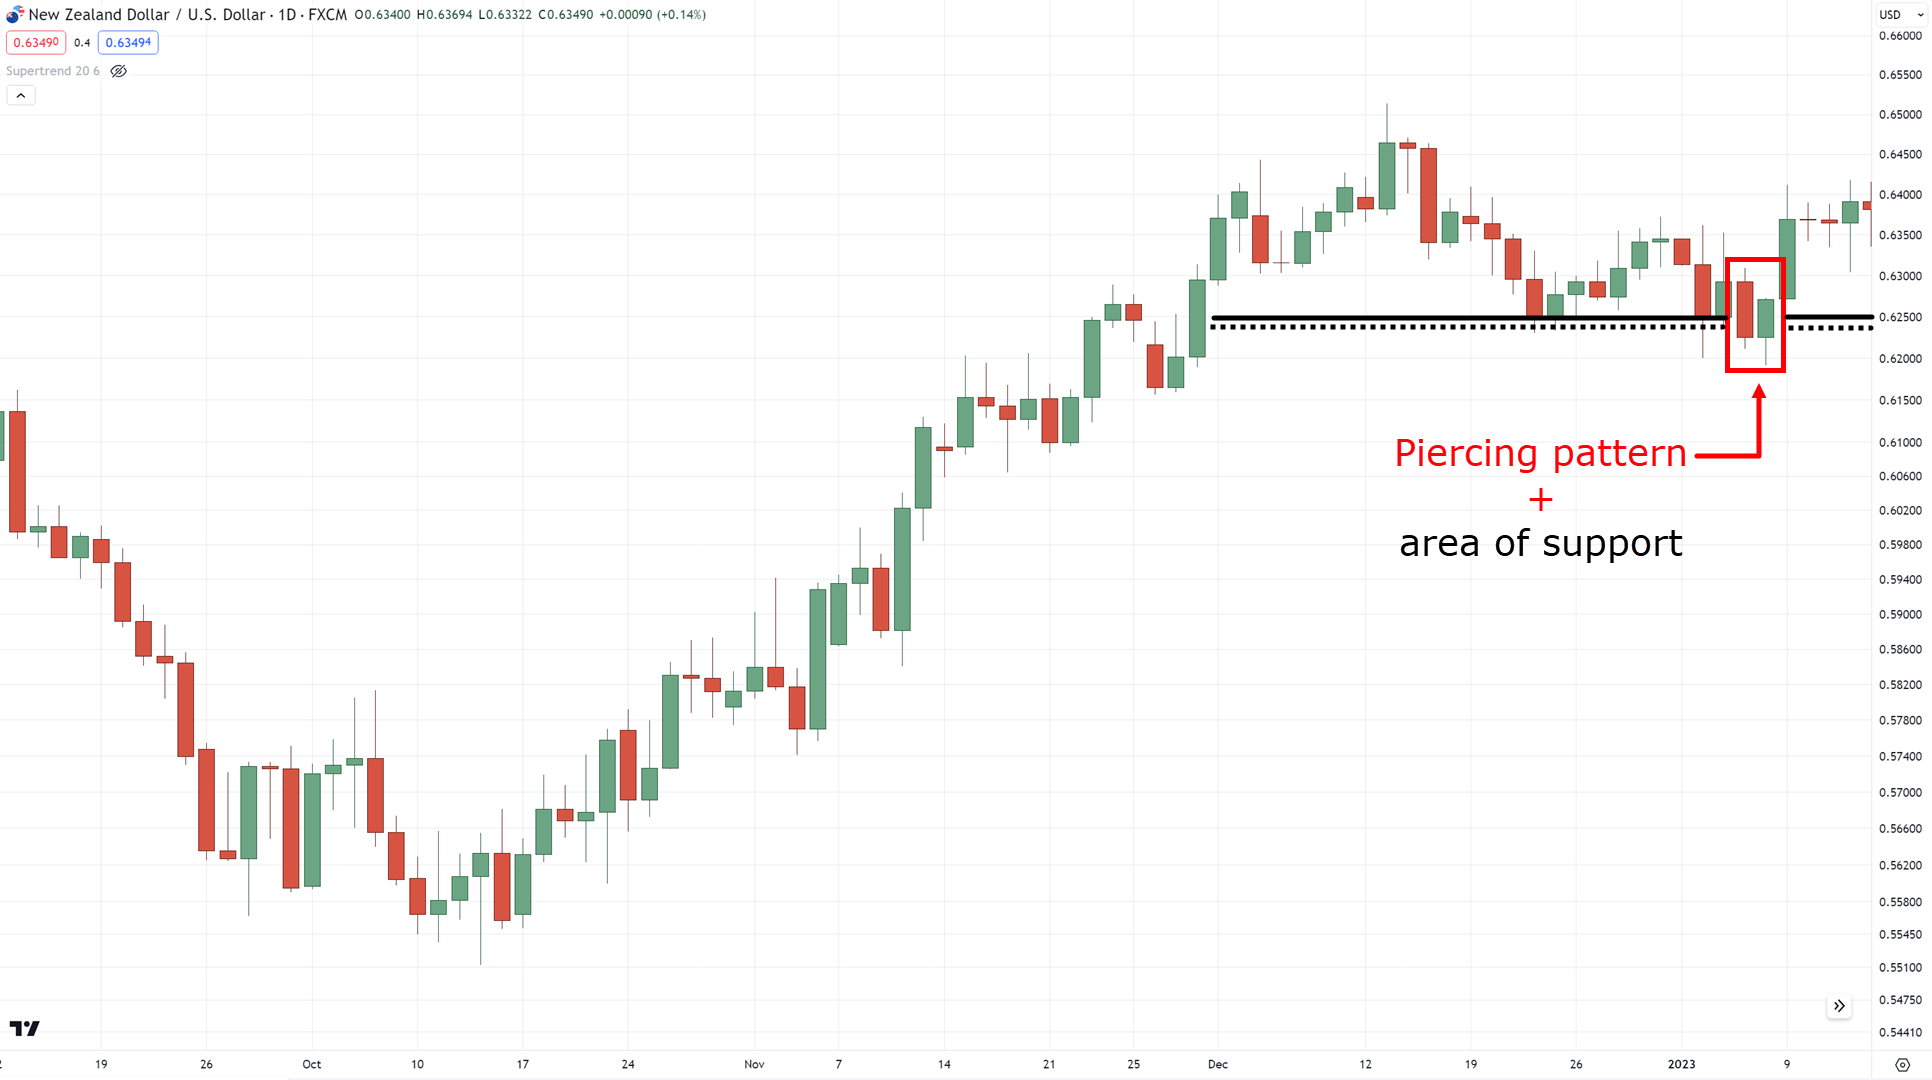
Now, since our example is in an uptrend we’d like to look for an area of support:
P.S. There’s more than one type of area of values which you can learn more here.
Onto the checklist…
Market structure?
Check.
Area of value?
Check.
Next?
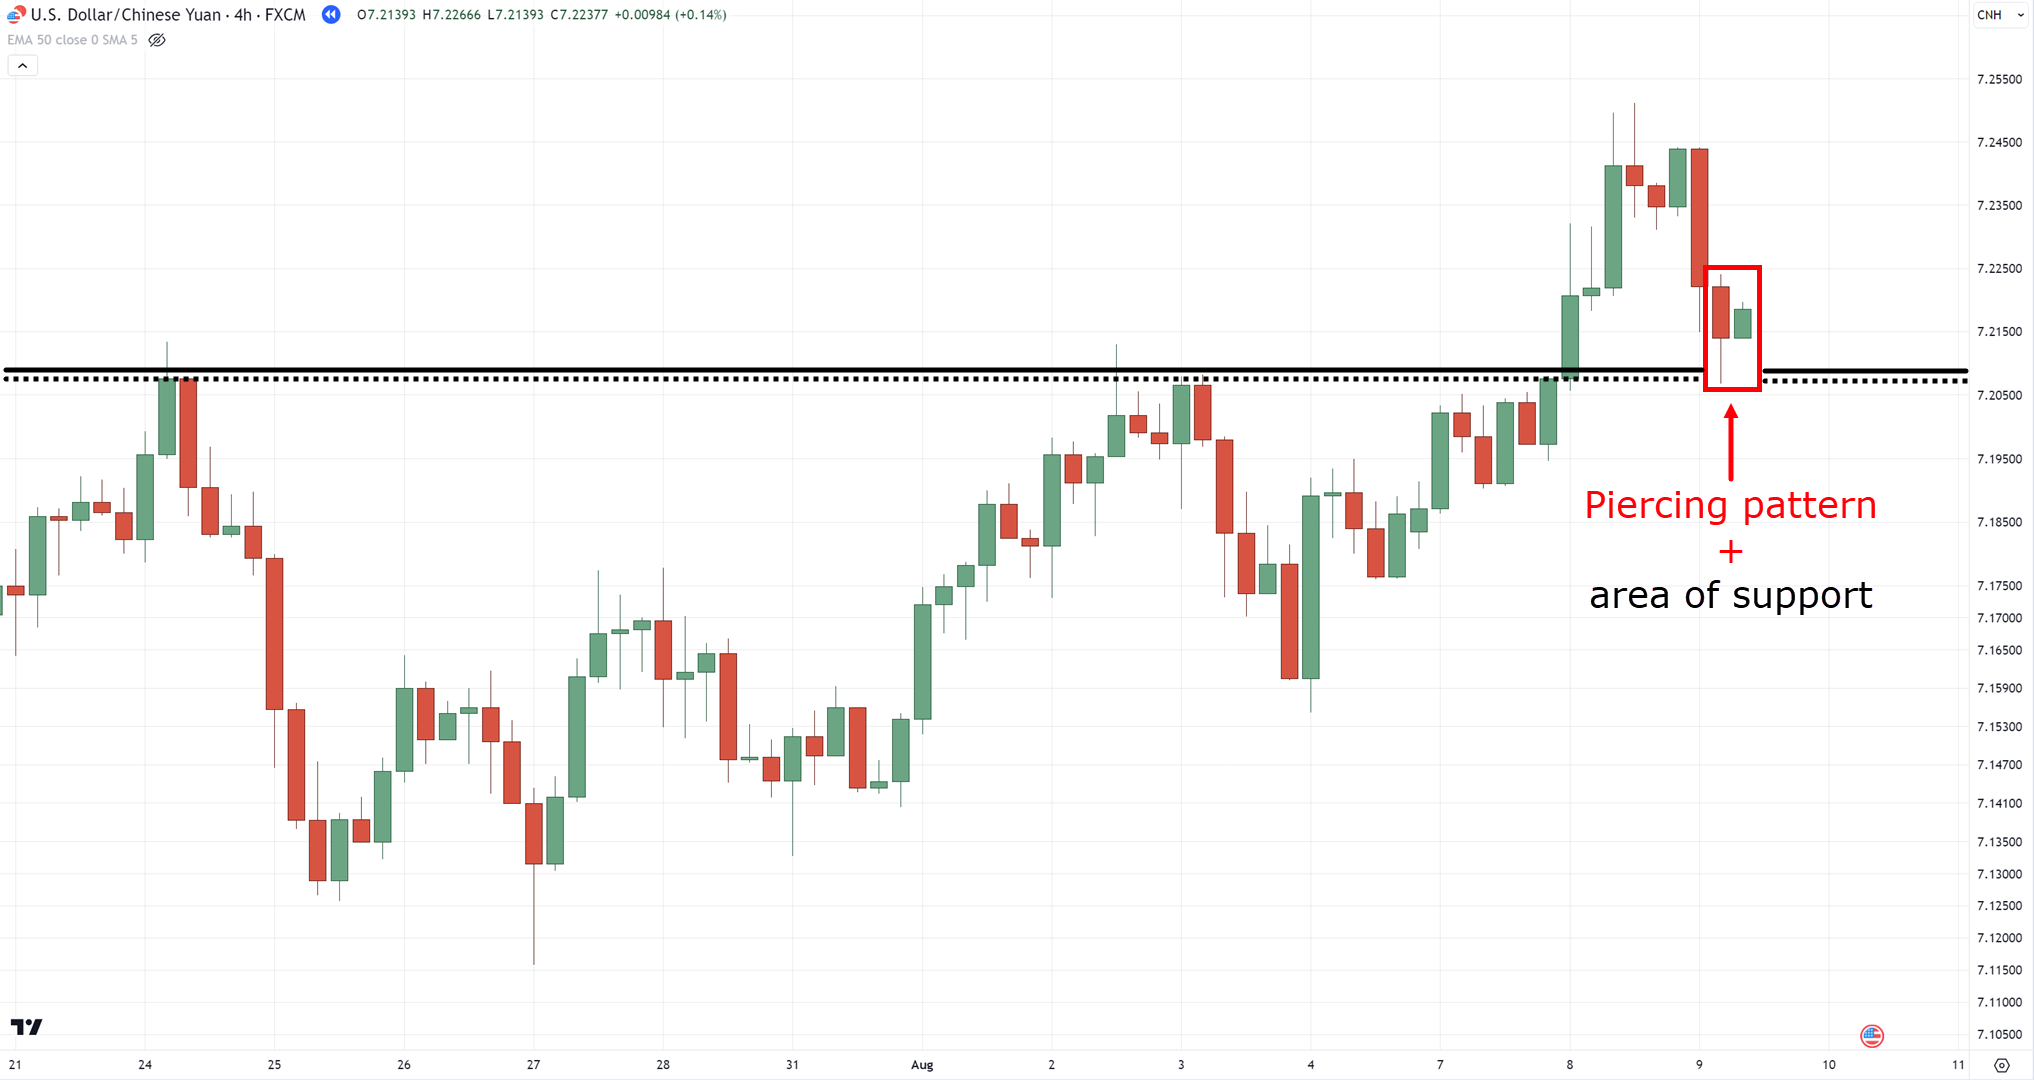
Step #3: Identify your entry (piercing pattern)
At this point, this requires no further explanation.
We can find this setup here:
Pretty straightforward, right?
The piercing pattern must always be traded only when an area of value is present!
Now…
It’s easy to enter trades, but a few (new) traders ask:
When do we exit?
Step #4: Identify your exits
This doesn’t only mean when we take profits, it also means when we cut our losses.
That’s right!
It’s not always about the cash, but also how you manage your risk!
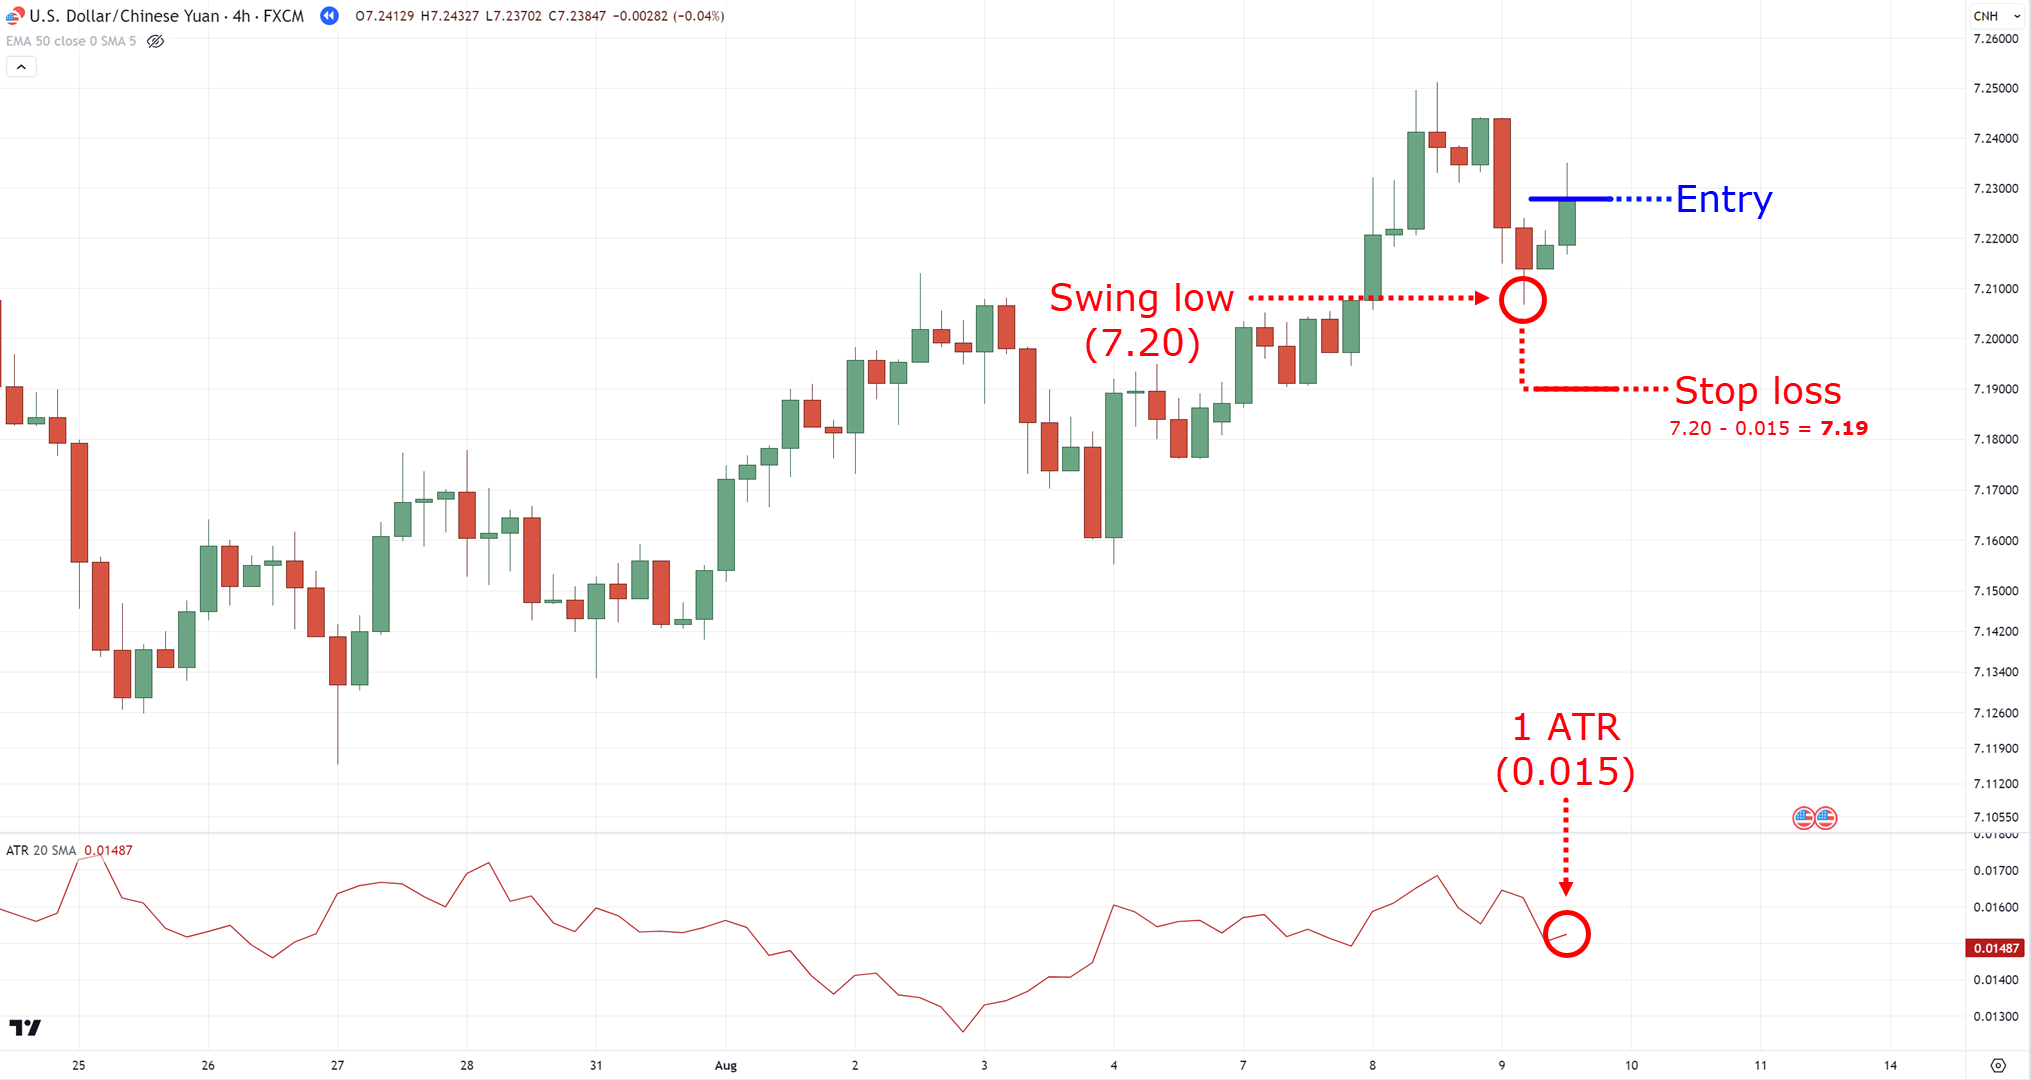
So, as for our stop loss…
Subtract 1 ATR from the lows:
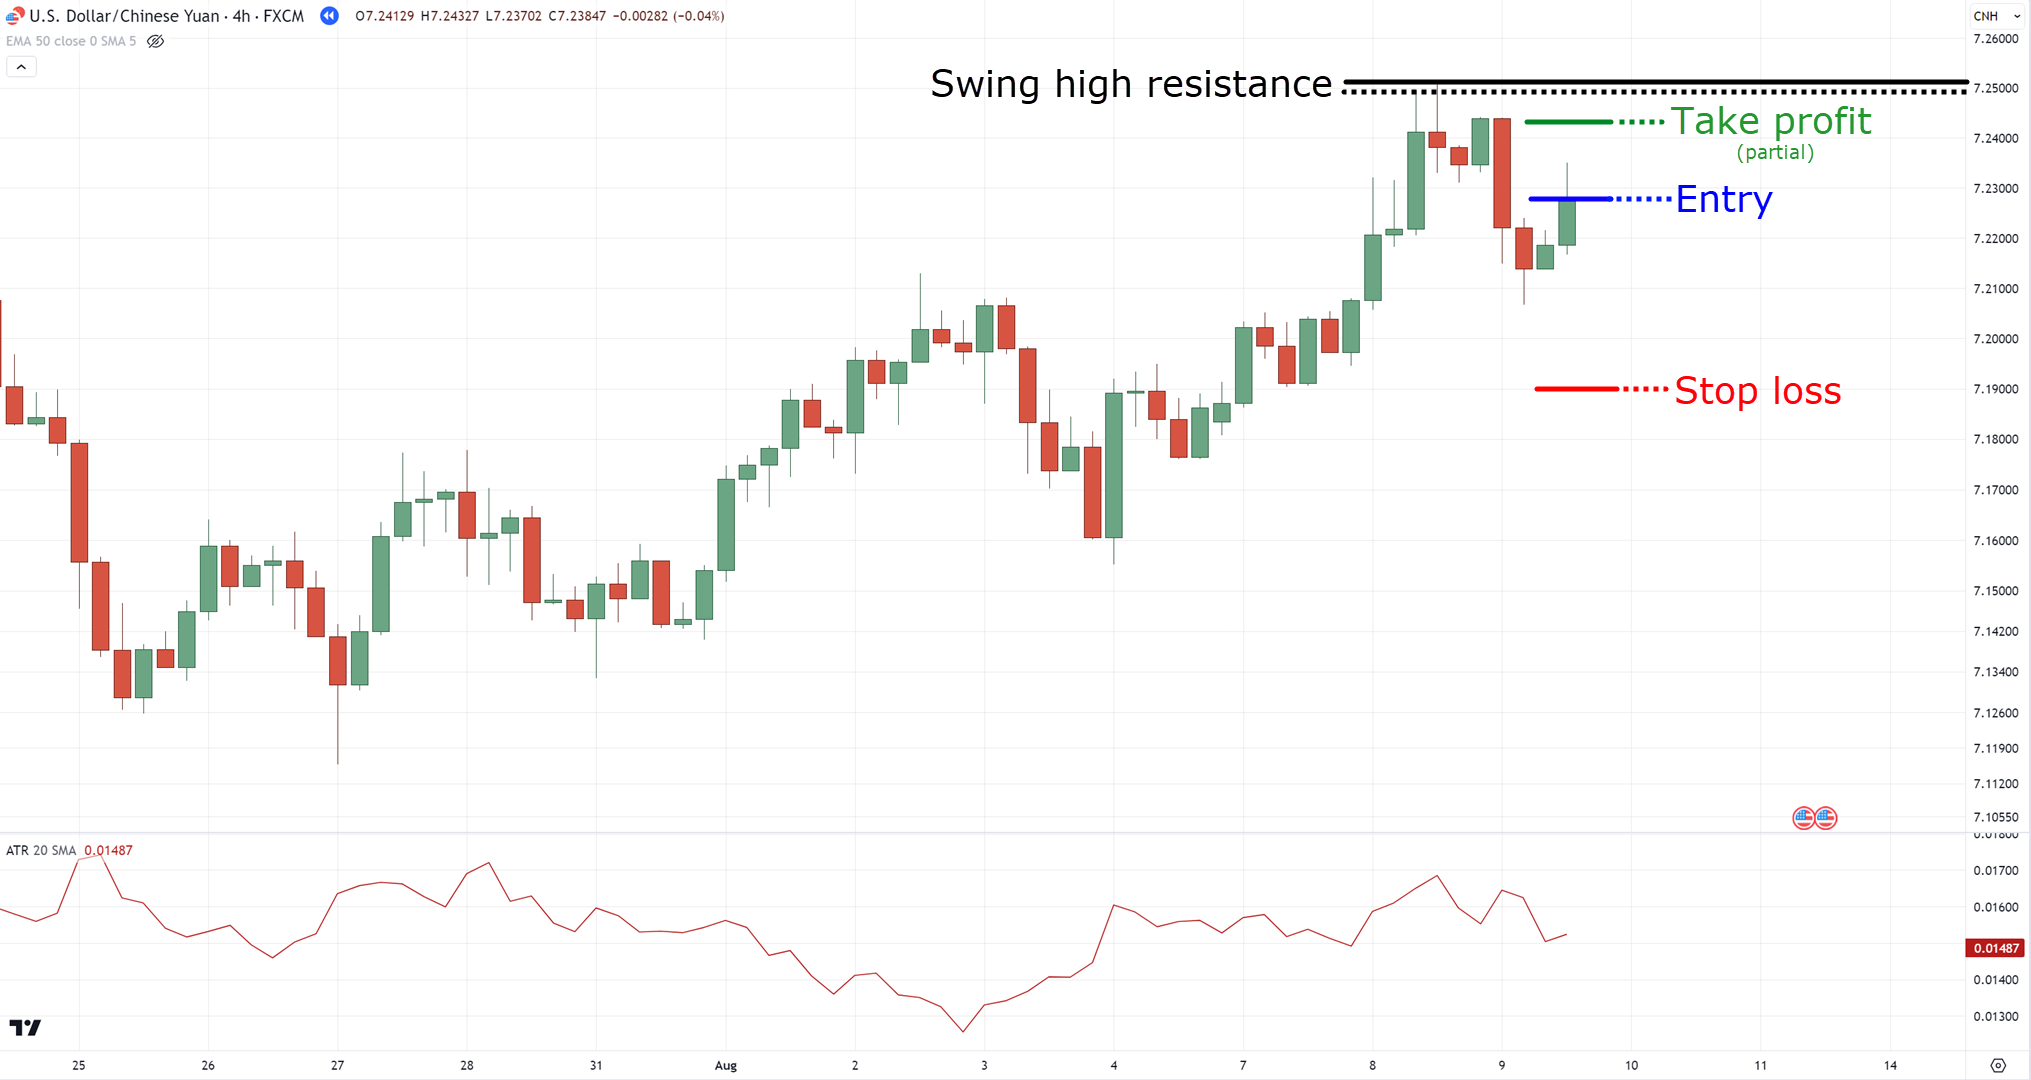
And for taking profits (the best part, I know) you’d want to take profit before the nearest high:
When trading range markets, the same principle applies.
But yes, I know…
The risk to reward doesn’t look too pretty.
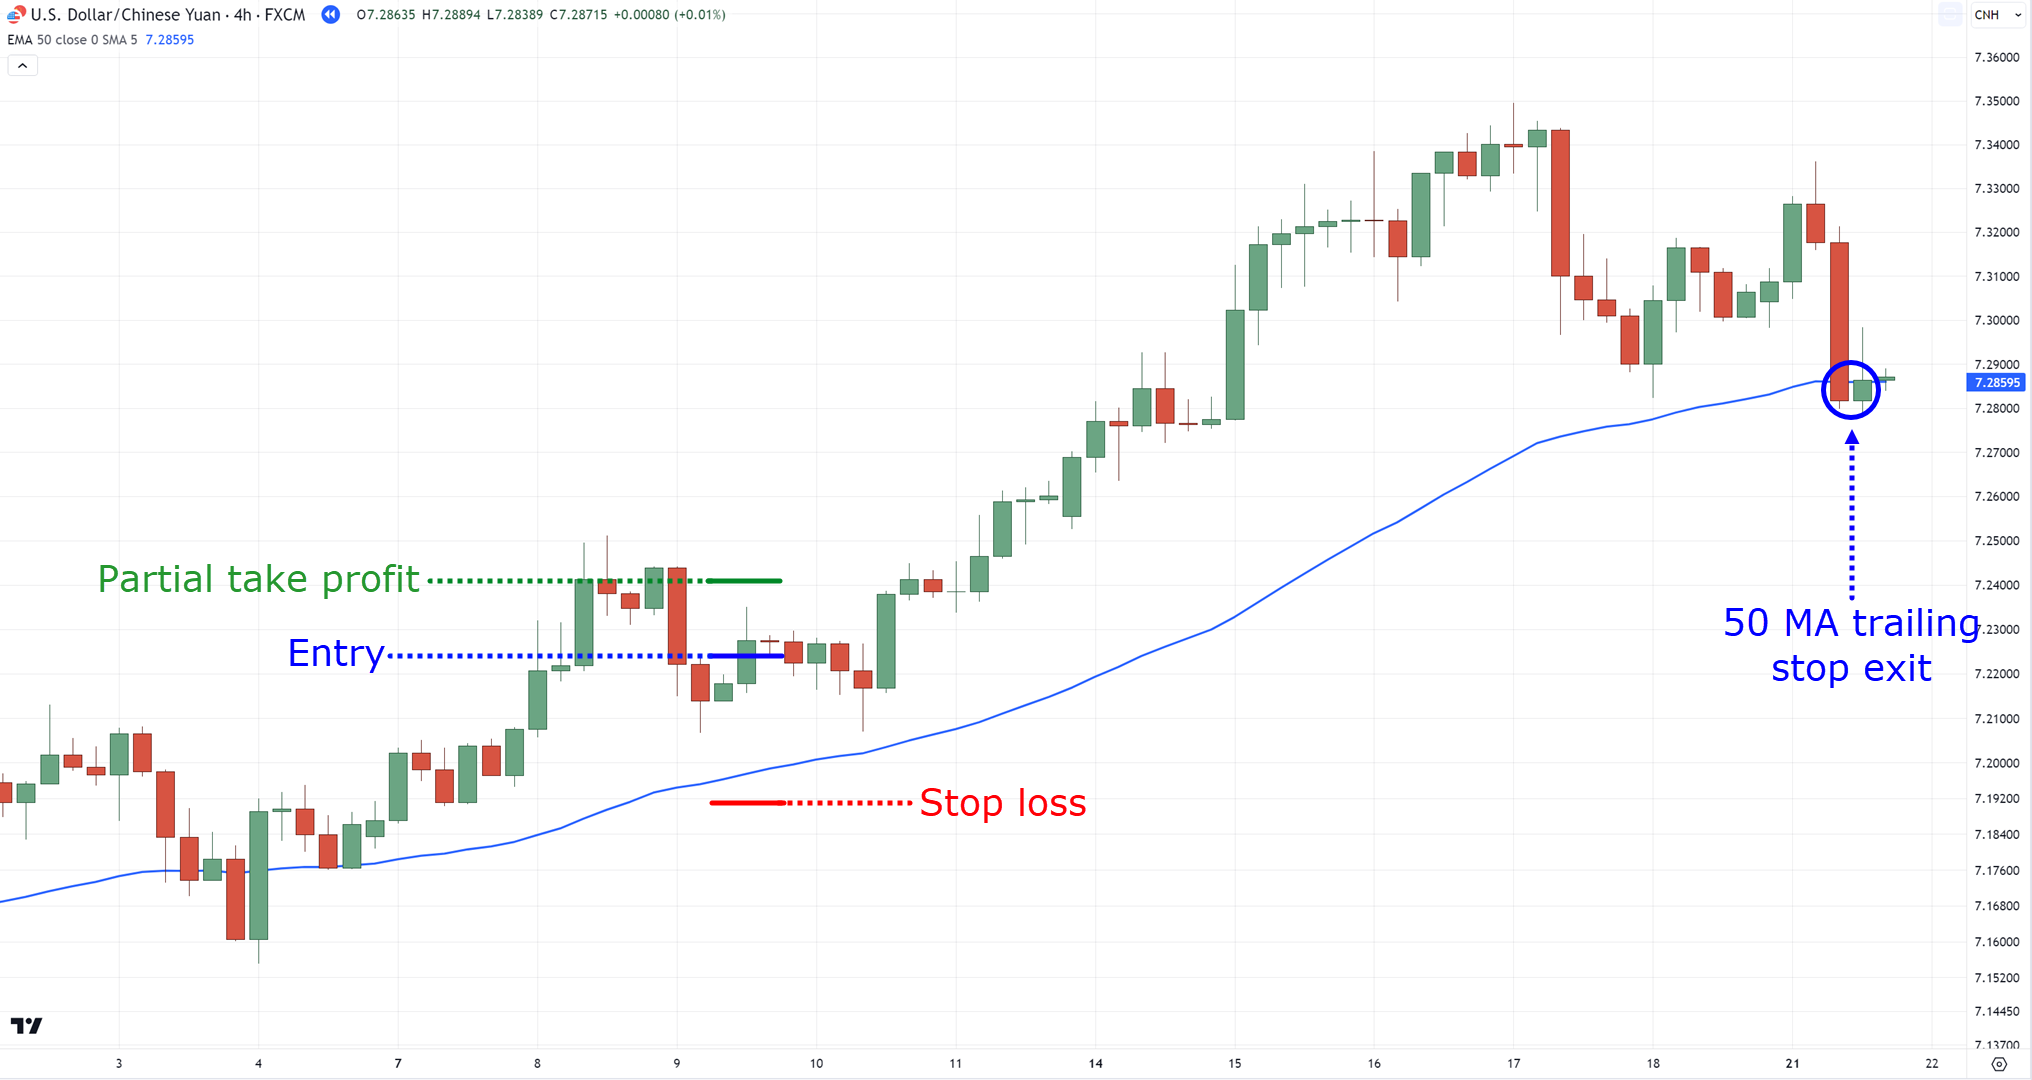
That’s why you can partially take profits and then trail your stop loss:
Makes sense?
Now, I know I’ve skimmed past many points such as risk management and trade management.
But not to worry as you can learn more about it here:
How to Use Trailing Stop Loss (5 Powerful Techniques That Work)
The Complete Guide to ATR Indicator
Before I let you go into the wild…
You must know how NOT to use the piercing candlestick pattern as well.
So, read on!
How NOT to use the piercing pattern in the markets
In any trading concept…
It’s crucial to know how that concept is meant to be used, as well as how not to use it.
Why?
Simple, because the piercing pattern itself is a tool!
And the effectiveness of such a tool depends on how well you use it.
So, when or how do you NOT use the piercing pattern?
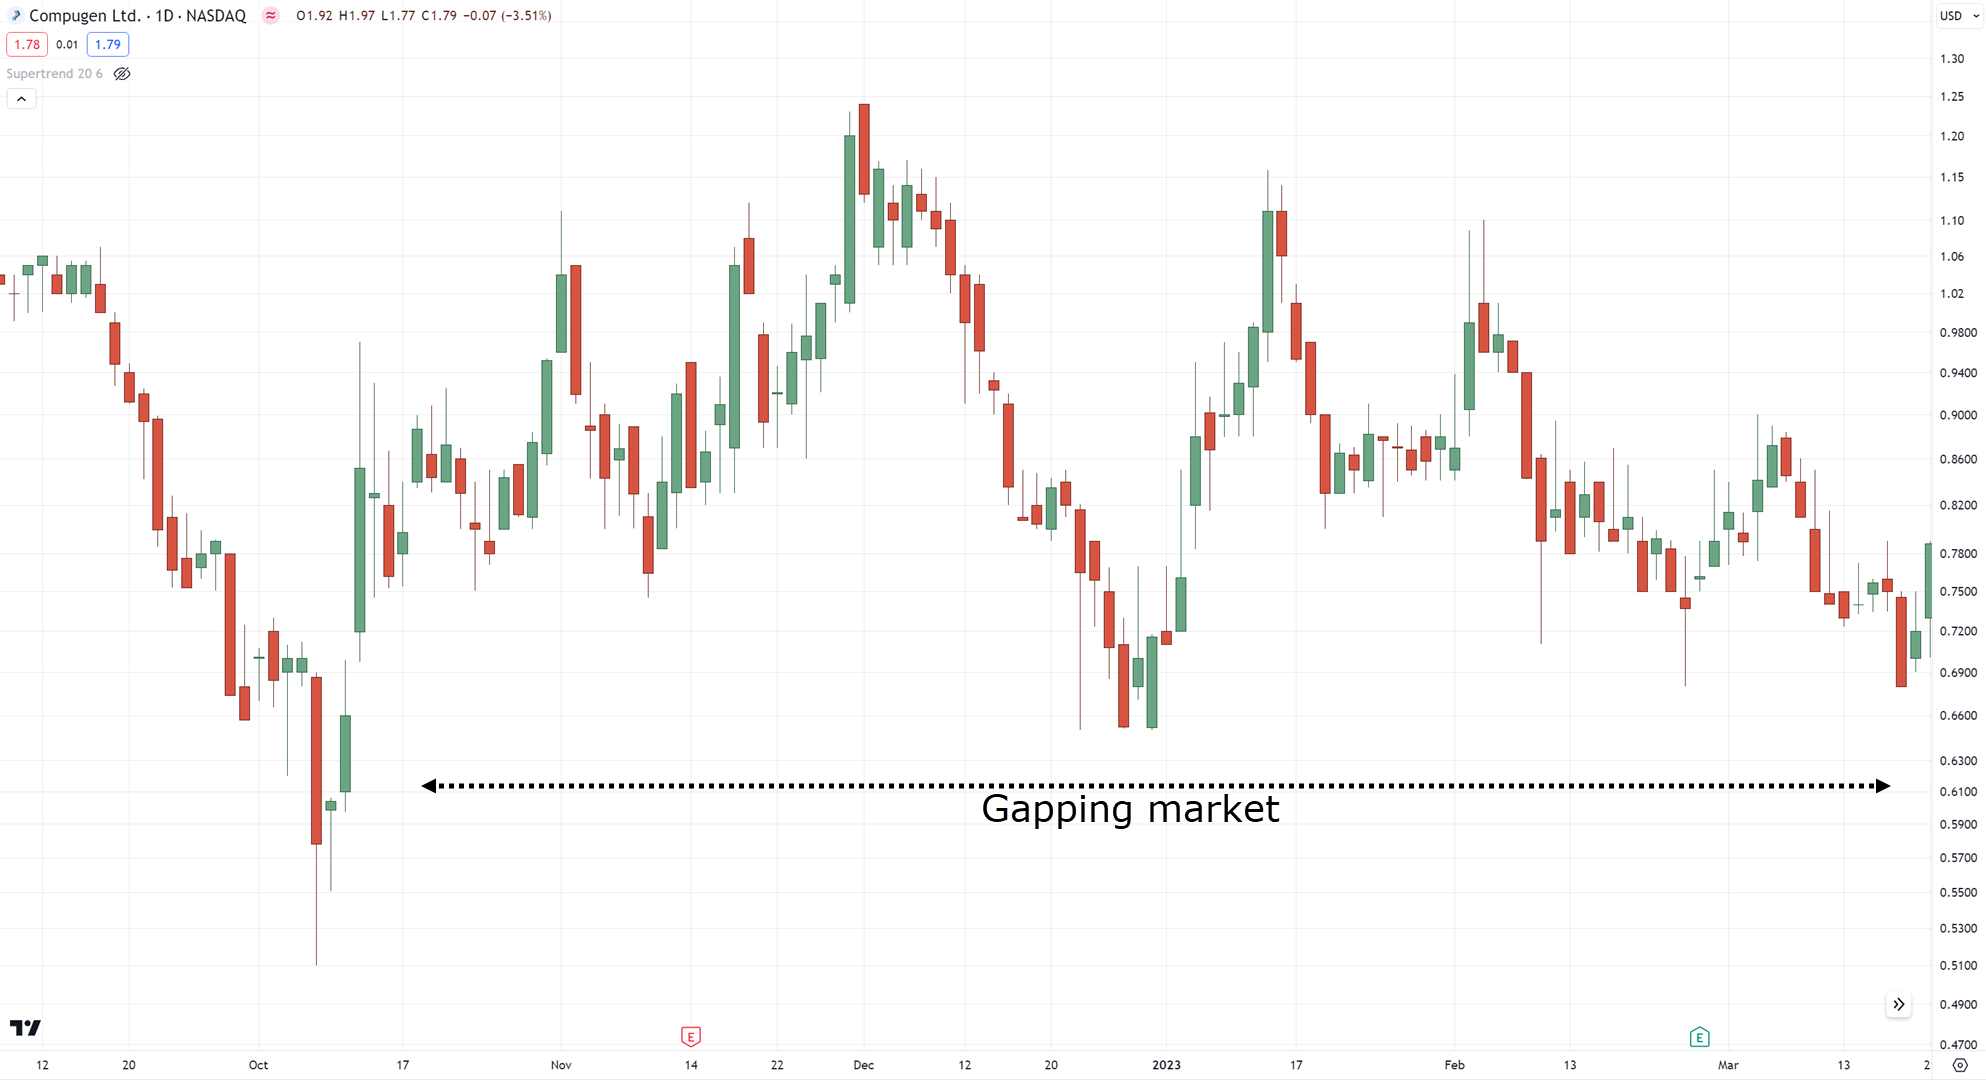
Do not use the piercing pattern stop order method on gapping markets
If you often find yourself ending up on charts like this:
Then forget about using candlestick patterns in general.
Why?
Because you’re simply getting a TON of false signals there!
This means that a line chart would provide better information when trading on charts like those.
(though these kinds of charts are often common in penny stocks or illiquid crypto coins)
Next…
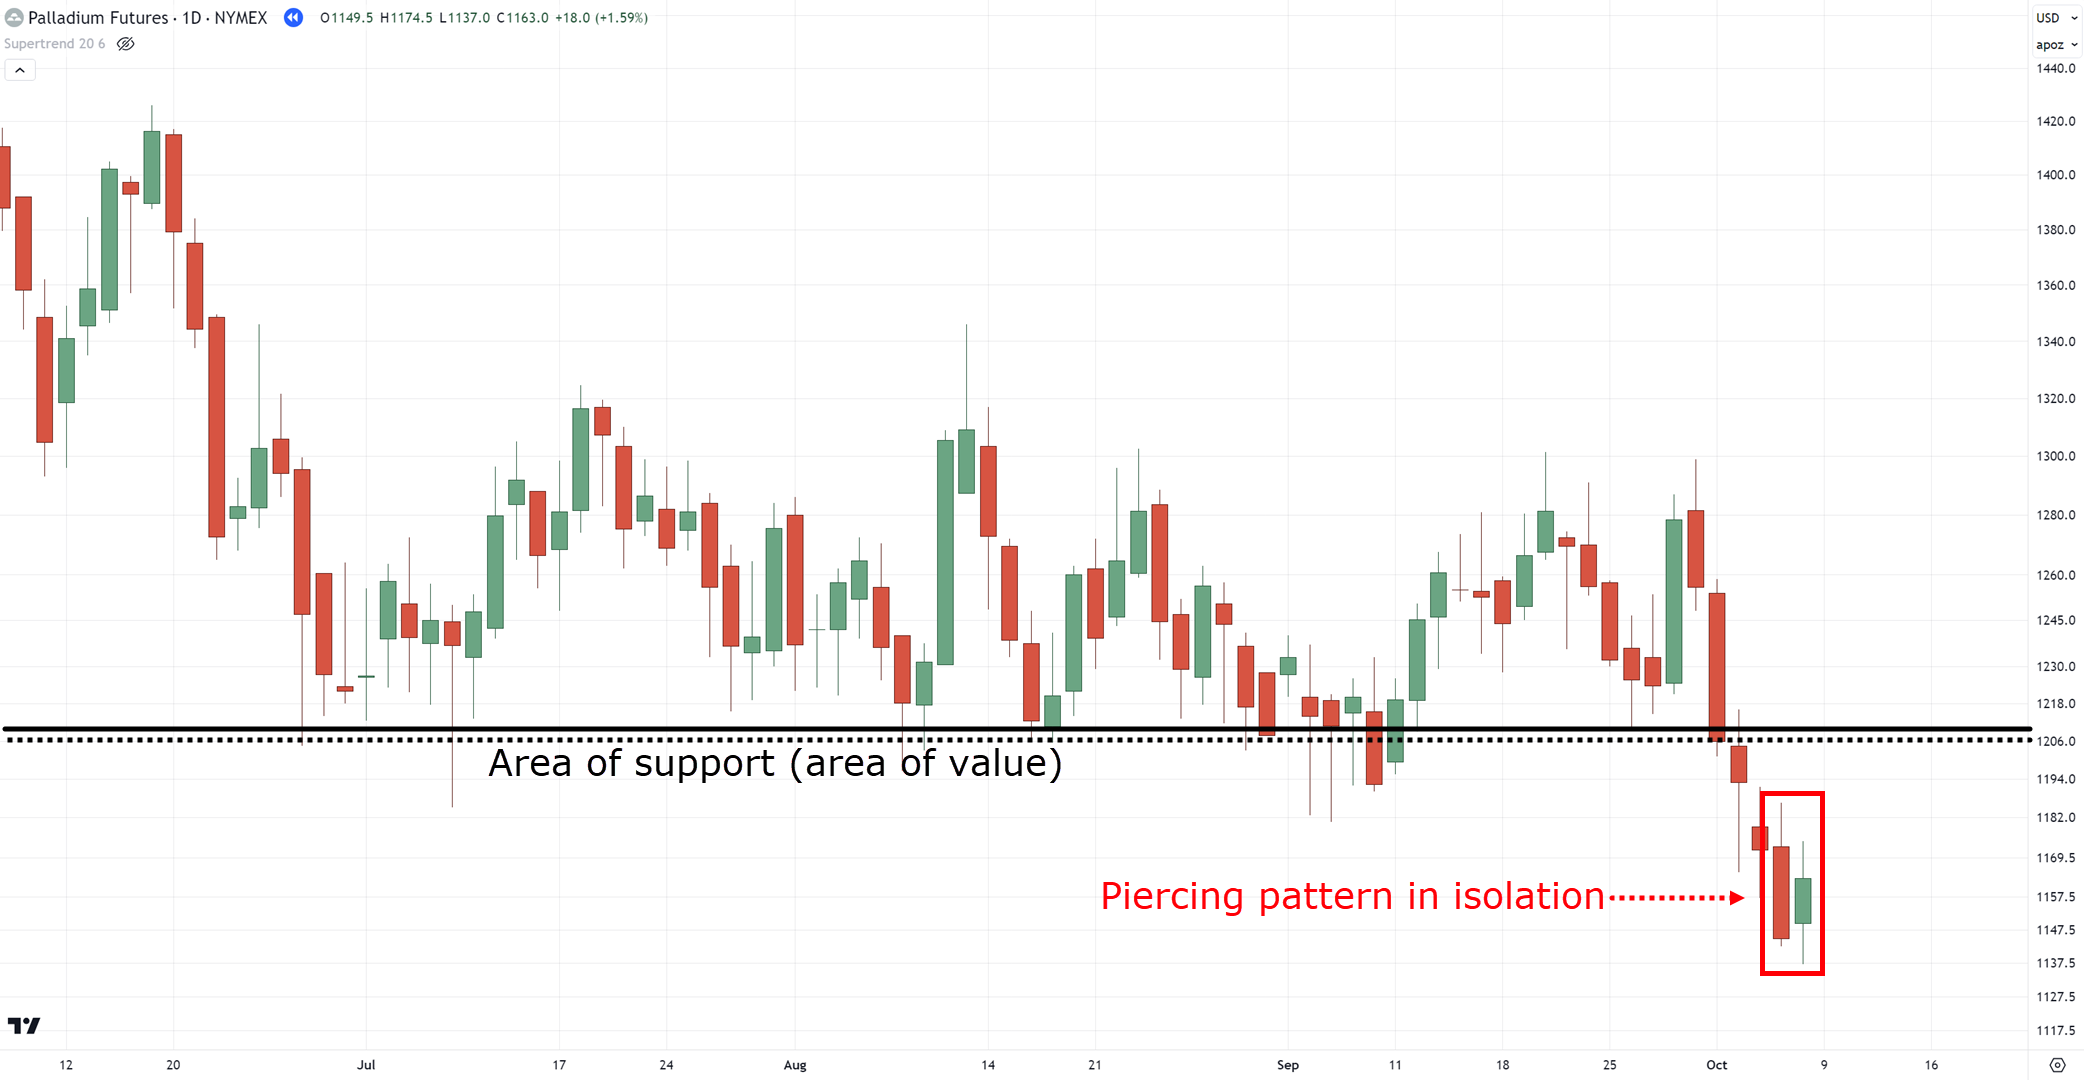
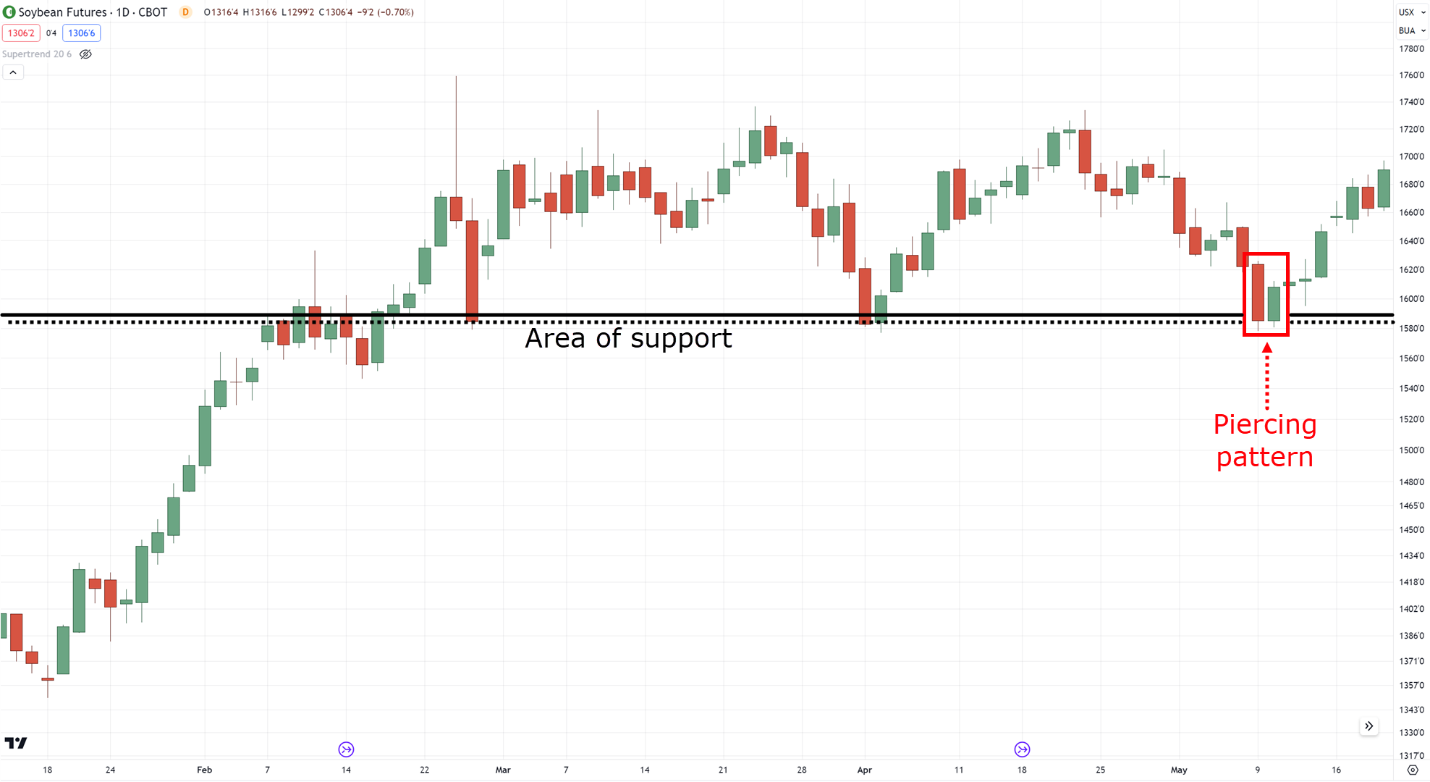
Never use the piercing pattern in isolation
This is the big hole that I’ve taught you how to plug throughout this guide.
But it needs to be said one last time:
Always use the piercing pattern in the context of the market.
In short?
Don’t trade the piercing pattern like this:
Trade it like this:
Knowing your areas of value is crucial!
That’s pretty much it!
A quick and snappy guide to identifying the piercing pattern!
So, let’s have a quick recap of what you’ve learned today.
Shall we?
Conclusion
With a ton of candlestick patterns to memorize out there…
The piercing pattern provides you with great flexibility to enter your trade on your terms.
Nonetheless, here’s what you’ve learned in today’s guide:
- A piercing pattern is formed when a candle closes 50% of the previous candle (this key rule is what differentiates the piercing pattern from other patterns out there)
- The piercing pattern can be used to enter your trades by taking advantage of the buy-stop order or sell-stop order to make your trading easier
- A proven way to trade the piercing pattern is to use the M.A.E.E formula, a step-by-step to analyzing, entering, and exiting your trades
- A piercing pattern (or any candlestick pattern) is not meant to be used on illiquid markets, as well as being traded in isolation, or using it without the context of the market structure
Over to you!
Do you think you can apply some concepts here to other candlestick patterns?
Also, do you prefer to enter your trade at the current price?
Or do you prefer to put limit or stop orders to make things easy for you?
Let me know in the comments below!





#3 in the Quick Test is not a Piercing Pattern. It did not gap below the previous bar.
Hey there Don, while the “textbook” definition of a Piercing Pattern requires the price to gap down, the “gap” doesn’t necessarily apply to some markets with high liquidity such as the Forex
So, in this guide, I tried to make the Piercing Pattern relevant to non-gapping markets as well!
Hi Rayner. Thanks so much for your knowledge. Your teachings have given me confidence to do trades. I prefer limit orders when I’m bullish and stop orders when I’m bearish. Then I set my exit if things don’t go as plan. The hard thing for me is finding the patterns as they occur. I seem to miss them most of the time because I don’t check often enough or I forget to check 1 day. Very frustrating.
Regards
Edgar
Hey Edgar, building a trading routine is key, know when and when not to trade!
Nonetheless, there will be trades that we miss and that’s part of trading, nonetheless, keep at it!
You have to use a good scanner that will pull stocks that qualify for the pattern and then save them in your watchlist and then track.
The simplest way is to set your scanner to pull stocks that have confirmation green candle after the bullish piercing candle.
Thanks for chipping in, Sam!
Thank you @Ryan welesrn do much from you, I like buy /sell stop orders to use with piercing patten
You’re welcome, Anne!
Let me know how it goes for you!
Great article. You are a great teacher. I don’t know what a buy stop order is. I have to learn. Thanks, I have learned from you for years, likenTAE and candlesticks but now I’m learning candlestick patterns. I will be studying charts and will practice how to identify piercing patterns. I have not been very successful at trading. I quit but now I am going to try again because I have nothing for retirement and I’m over 50. I watched SPY go up and was too scared to enter, I also leave a lot of money on the table due to selling prematurely. I can’t afford any programs nowndue to low income. Thank you for all of your help that you offer for free! God will bless you!
Hey Christie, I appreciate you sharing your journey with us, never too late to learn new things!
I hope this guide helped you out!
Great article thanks Rayner.
You’re welcome, Dave!
Limit order
Thanks for sharing, Abdullahi!
Great stuff. Will certainly incorporate it in
my trading.
Looking forward to seeing your results, Mahomed!
In a couple earlier articles you mention the Piercing Pattern but I was not able to find an article on it by you. So, thanks for writing this as it has been on my mind.
I really need some further explanation of this Pattern from you. You start off explaining the P.P. very well with good drawings. You made it very clear that a P.P. had 2 parts: The gap down at the Open and a close 50% or higher of the previous candle.
In every example of an Uptrend, as well as the Quiz you provided, you showed a P.P. with those 2 parts clearly seen. But, the examples you showed for the Downtrends, Range, Buy-Stop Order (the 2nd Order when the first one did not trigger), and the M.A.E.E. examples do not show any Gap Downs. In my mind, these are Inside Bars, not Piercing Patterns. And, you incorporated a Dark Cloud Cover. Is a Dark Cloud Cover a Piercing Pattern or a completely different Pattern? Do you have an article for a Dark Cloud Cover?
So, am I not understanding what a Gap Down is? Is a Gap Down less important than closing at 50%? Then, if an Inside Bar closes at 50% or greater then what separates it from a P.P. if there is no Gap Down?
Context, Structure, Area of Value, Risk Management very well covered here. I just need clarification of the “Gap Down” Rule.
Hey there Richard,
I appreciate that you were able to benefit from this guide.
Nonetheless, I tried to make the guide much more relevant for markets that do not usually gap such as the Forex market or Crypto, while I have clearly defined the “textbook” definition in the article…
I find it much more useful to actually trade the Piercing Pattern by identifying it if the candle has closed 50% of the previous candle, and NOT necessarily opened and gapped below it.
If the current candle did not close above 50% of the previous candle, then it’s an inside bar (a pennant on the lower timeframe), if it does close above it, then it is (by principle) a sign of strength as it makes a false break on the lower timeframe
Also, the Dark Cloud Cover is the same as the piercing pattern, but just the opposite of it!
Similar to the hammer pattern, its counterpart is the shooting star.
The same way with the Piercing pattern , its bearish setup is the Dark Cloud Cover
I hope that clarifies things!
I would love to use it in stop orders, thanks for this wonderful knowledge you have put in me❤
Let me know how it works for you, Lydia!
Thank you Rayner for this package! It’s an eye opener to me and I will definitely apply the instructions here in my trading going forward.
You are most welcome, Peter!